Vue_시작하기
[작업 환경 만들기]
0.node 설치(14.18.2 버전)
https://nodejs.org/ko/download/releases/
이전 릴리스 | Node.js
Node.js® is a JavaScript runtime built on Chrome's V8 JavaScript engine.
nodejs.org
윈도우 64, ***msi 파일 받아야한다
> 설치 및 버전확인
npm -v
node -v
1.npm설치
npm : 자바스크립트 프로그래밍 언어를 위한 패키지 관리자
https://github.com/coreybutler/nvm-windows/releases
Releases · coreybutler/nvm-windows
A node.js version management utility for Windows. Ironically written in Go. - coreybutler/nvm-windows
github.com
2. 폴더 만들기
C:\Workspace\vuetest
3. Vue.js 설치
-1)vue-cill 설치
vue-cill : 뷰의 개발 환경을 설정해 주는 도구
npm install -g @vue/cli****버전 중요하다 4.5.15로 설치해야 mqtt 오류가 나지 않는다 !!!!!!!!!!!!(그밖에 많은 문제 해결됨....)
npm install -g @vue/cli@4.5.15
-2)vue 프로젝트 생성
프로젝트 이름 : vueproj
vue create vueproj
-3)설치 옵션
옵션 선택 1) Please pick a preset: Manually select features
Vue CLI v4.5.15
? Please pick a preset:
  Default ([Vue 2] babel, eslint)
  Default (Vue 3) ([Vue 3] babel, eslint)
> Manually select features
옵션 선택 2) Check the features needed for your project: Choose Vue version, Babel, Router, Vues, Linter / Formatter
Vue CLI v4.5.15
? Please pick a preset: Manually select features
? Check the features needed for your project:
 (*) Choose Vue version
 (*) Babel
 ( ) TypeScript
 ( ) Progressive Web App (PWA) Support
 (*) Router
>(*) Vuex
 ( ) CSS Pre-processors
 (*) Linter / Formatter
 ( ) Unit Testing
 ( ) E2E Testing
옵션 선택 3) Choose a version of Vue.js: 2.x
? Choose a version of Vue.js that you want to start the project with (Use arrow keys)
> 2.x
  3.x
옵션 선택 4) Use history mode: Y
? Use history mode for router? (Requires proper server setup for index fallback in production) (Y/n) Y
옵션 선택 5) Pick a linter / formatter config: ESLint + Prettier
? Pick a linter / formatter config:
  ESLint with error prevention only
  ESLint + Airbnb config
  ESLint + Standard config
> ESLint + Prettier
옵션 선택 6) Pick additional lint features: Lint on save
? Pick additional lint features: (Press <space> to select, <a> to toggle all, <i> to invert selection)
>(*) Lint on save
 ( ) Lint and fix on commit
옵션 선택 7) Where do you prefer placing config: In dedicated config files
? Where do you prefer placing config for Babel, ESLint, etc.? (Use arrow keys)
> In dedicated config files
  In package.json
옵션 선택 8) Save this preset: N
? Save this as a preset for future projects? (y/N) N
옵션 선택 최종 화면 확인
Vue CLI v4.5.15
? Please pick a preset: Manually select features
? Check the features needed for your project: Choose Vue version, Babel, Router, Vuex, Linter
? Choose a version of Vue.js that you want to start the project with 2.x
? Use history mode for router? (Requires proper server setup for index fallback in production) Yes
? Pick a linter / formatter config: Prettier
? Pick additional lint features: Lint on save
? Where do you prefer placing config for Babel, ESLint, etc.? In dedicated config files
? Save this as a preset for future projects? (y/N) N
위와 같이 최종 세팅을 확인하고 엔터(Enter) 키를 누른다.
4. 서비스 실행
npm init
https://m.blog.naver.com/dsz08082/221921449922
[Vue.js] webpack 설치
webpack 설치 환경 설정 Vscode를 사용해 Todo 앱을 예제에 맞게 만든다. 우선 VsCode로 프로젝트를 진...
blog.naver.com
(웹펙으로 관리하려면 위의 사이트 )
webpack을 설치하자. webpack은 개발할 때만 필요한 모듈이고 webpack-cli는 터미널에서 웹팩 명령을 실행하는 도구다. webpack-dev-server는 개발용 실시간 Reload 서버 실행을 위한 패키지다.
npm install --save-dev webpack
npm install --save-dev webpack-cliconst path = require('path')
module.exports = {
//진입점
entry: {
app: path.join(__dirname, 'main.js') //별칭
},
// 결과물에 대한 설정
output: {
filename: '[name].js', //app.js
path: path.join(__dirname, 'dist')
},
module: {},
plugins: []
}vue loader 설치
npm install -D vue-loader vue-template-compiler
webpack.config.js 수정
const path = require("path");
const VueLoaderPlugin = require("vue-loader/lib/plugin");

module.exports = {
  //진입점
  entry: {
    app: path.join(__dirname, "main.js"), //별칭
  },
  // 결과물에 대한 설정
  output: {
    filename: "[name].js", //app.js
    path: path.join(__dirname, "dist"),
  },
  //모듈
  module: {
    rules: [
      {
        test: /\.vue$/,
        loader: "vue-loader",
      },
    ],
  },
  plugins: [new VueLoaderPlugin()],
};
cd vueproj
******
npm install
******맨처음에 해줘야 오류 안뜬다
code .
code . 하면 비주얼 코트 실행된다.
> npm run serve
(참고: package.json파일의 "scripts"부분을 확인하면 "serve"명령어 실행을 알 수 있다.)
서비스 확인(웹 브라우저)
http://localhost:8080
서비스가 제대로 뜨는지 화면을 확인한다.
참고 서비스 종료는 Ctrl-C로 종료시킬 수 있다.
<VS Code 환경설정>
[Extensions 설치]
다음의 Extensions를 설치한다.
Vetur : vue파일의 코드 색깔을 처리해 줌
ESLint : ESLint를 처리해 줌
Vue VSCode Snippets : vue에 대한 snippet을 지원함
(참고: VSCode에서는 나만의 snippet을 만들어 사용할 수 있다.)
Prettier - Code formatter - 설치
(프리티어 설정 ) 아래사이트
https://allonsyit.tistory.com/66
[VSCode] prettier 설정 방법 / 적용 안될때 해결 방법
1. extestion -> prettier 설치 2. [mac] 기본 설정 -> 설정 / [windows] preferences - Default Formatter 설정 Default Formatter 검색해서 Prettier - Code formmater 를 지정해줘야 적용이 된다 초기 값은 없..
allonsyit.tistory.com
>>eslint : 규칙 정해줘야 한다.
ESLint는 JavaScript 코드에서 발견된 문제 패턴을 식별하기 위한 정적 코드 분석 도구입니다. ESLint의 규칙은 구성 가능하며 사용자 정의된 규칙을 정의하고 로드할 수 있습니다. ESLint는 코드 품질과 코딩 스타일 문제를 모두 다룹니다. 위키백과(영어)https://blog.whitekiwi.link/vscode-eslint-%EC%9E%90%EB%8F%99-%EC%A0%81%EC%9A%A9%ED%95%98%EA%B8%B0-fe1fd7e11928
ESLint - Wikipedia
From Wikipedia, the free encyclopedia Jump to navigation Jump to search JavaScript code analysis software ESLint is a static code analysis tool for identifying problematic patterns found in JavaScript code. It was created by Nicholas C. Zakas in 2013.[1][2
en.wikipedia.org
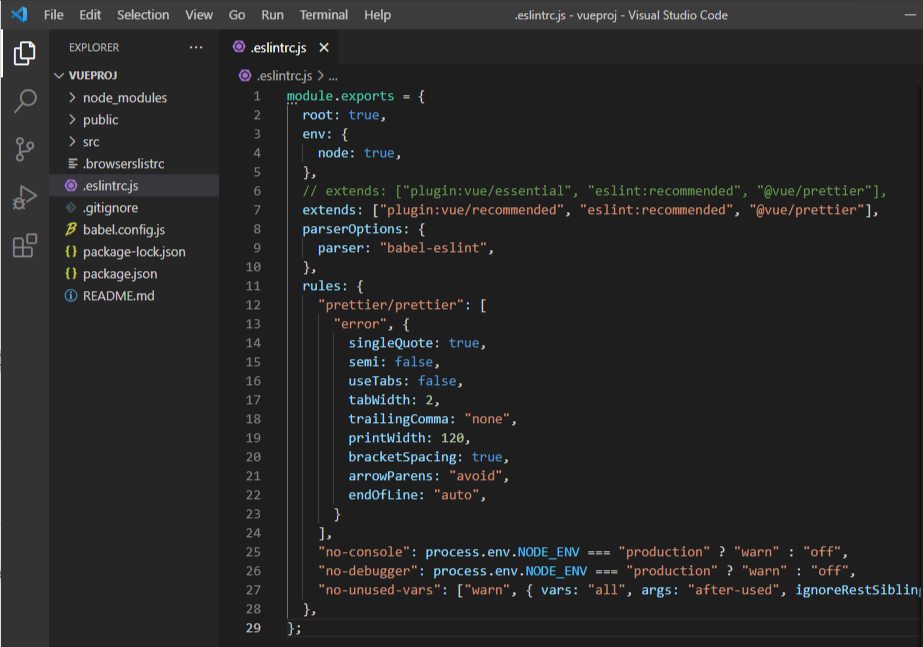
module.exports = {
  root: true,
  env: {
    node: true,
  },
  // extends: ["plugin:vue/essential", "eslint:recommended", "@vue/prettier"],
  extends: ["plugin:vue/recommended", "eslint:recommended", "@vue/prettier"],
  parserOptions: {
    parser: "babel-eslint",
  },
  rules: {
    "prettier/prettier": [
      "error", {
        singleQuote: true,
        semi: false,
        useTabs: false,
        tabWidth: 2,
        trailingComma: "none",
        printWidth: 120,
        bracketSpacing: true,
        arrowParens: "avoid",
        endOfLine: "auto",
      }
    ],
    "no-console": process.env.NODE_ENV === "production" ? "warn" : "off",
    "no-debugger": process.env.NODE_ENV === "production" ? "warn" : "off",
    "no-unused-vars": ["warn", { vars: "all", args: "after-used", ignoreRestSiblings: false }],
  },
};
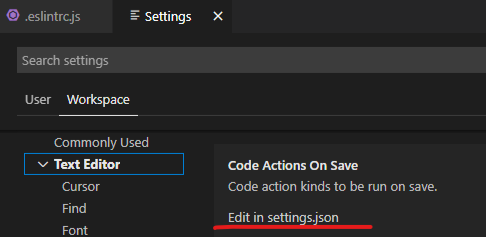
[visual code setting]
VS Code의 환경 설정 메뉴로 들어가서 settings.json파일을 생성한다.
- File > Preferences > Settings 접근
- Workspace탭 선택
- Text Editor > Code Actions On Save에서 Edit in settings.json을 클릭한다.
- 다음의 디렉터리 및 파일이 생성된다.
- 디렉터리:. vscode
- 파일: settings.json
eslint 환경설정 파일을 다음과 같이 설정한다.****
{
    "eslint.validate": [
      "vue", "javascript", "html"
    ],
    "eslint.alwaysShowStatus": true,
    "editor.codeActionsOnSave": {

      "source.fixAll.eslint": true
    },
    "eslint.workingDirectories": [ {"mode": "auto"} ],
    "editor.defaultFormatter": "esbenp.prettier-vscode",
    "editor.formatOnSave": false,
    "prettier.trailingComma": "all",
  }
error >
ESLint: Failed to load config "@vue/prettier" to extend from. Referenced from:

> Prettier 제거.

https://nuggy875.tistory.com/110
VSCode Prettier 적용 안 되는 오류
올해 어느샌가부터 VSCode에서 저장하면 자동으로 코드를 정렬해주는 Prettier가 작동하지 않았다. 귀찮아서 그냥 쓰고 있었지만, 원인을 알아내고 말았지.. VSCode > Preference (cmd+,) 들어가서 'Default For
nuggy875.tistory.com
[bootstrap-vue 설치]
bootstrap : 부트스트랩은 웹사이트를 쉽게 만들 수 있게 도와주는 HTML, CSS, JS 프레임워크이다. 하나의 CSS로 휴대폰, 태블릿, 데스크톱까지 다양한 기기에서 작동한다. 다양한 기능을 제공하여 사용자가 쉽게 웹사이트를 제작, 유지, 보수할 수 있도록 도와준다. 위키백과
Bootstrap
The most popular HTML, CSS, and JS library in the world.
getbootstrap.com
> npm install bootstrap@4.5.3 bootstrap-vue@2.21.2 --save
/src/main.js
import Vue from 'vue'
import App from './App.vue'
import router from './router'
import store from './store'

// bootstrap
import { BootstrapVue } from 'bootstrap-vue'
import 'bootstrap/dist/css/bootstrap.css'
import 'bootstrap-vue/dist/bootstrap-vue.css'
Vue.use(BootstrapVue)

Vue.config.productionTip = false

new Vue({
  router,
  store,
  render: h => h(App)
}).$mount('#app')
main.css 스타일 시트
스타일 시트 생성
/src/assets/style/main.css
.content-body {
  padding: 20px 20px 20px 20px;
}

.separate-body {
  height: 20px;
  background-color: #87CEEB;
}