
티스토리 뷰
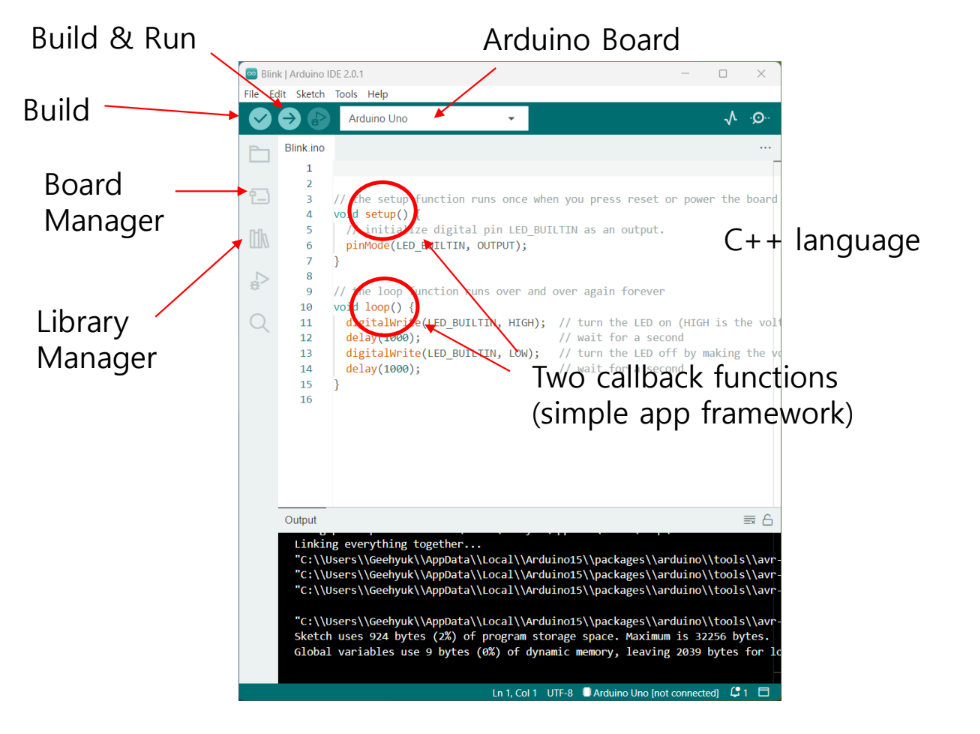
1.아두이노 ide 설치
2. 보드메니져에서 내가 사용할 보드 설치


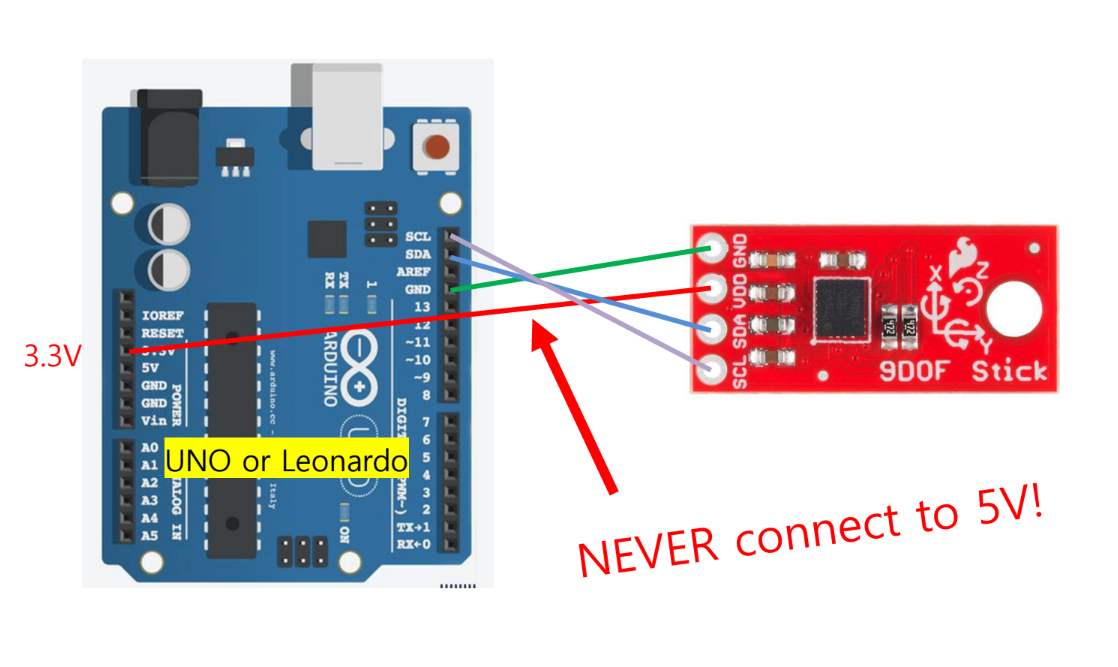
3. UNO 또는 레오나르도를 랩탑에 연결
- 현재 아두이노 보드를 선택
- 도구]->[보드]→[아두이노 AVR 보드]→<사용 중인 보드>

- 보드가 연결된 포트를 선택
- 도구]→[포트]→<포트 이름>
- 포트 이름은 "COM3"과 같다. 포트 번호는 다음과 같은 경우 변경됨
다른 보드를 사용하거나 다른 USB 포트를 사용했을 때 번호가 변경

- 포트 번호는 예측할 수 없지만 일반적으로는 문제가 없다.
메뉴에 포트 이름이 하나만 표시되기 때문.
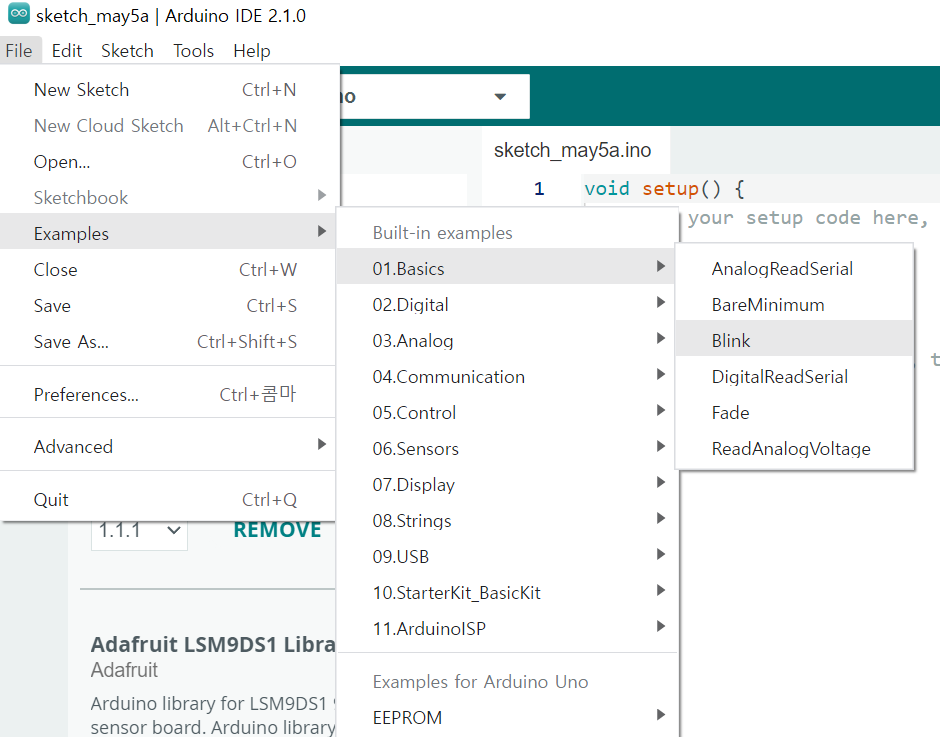
Test
– [File]->[Examples]->[01.Basics]->[Blink]
IMU 센서 활용할 거다. 선 연결

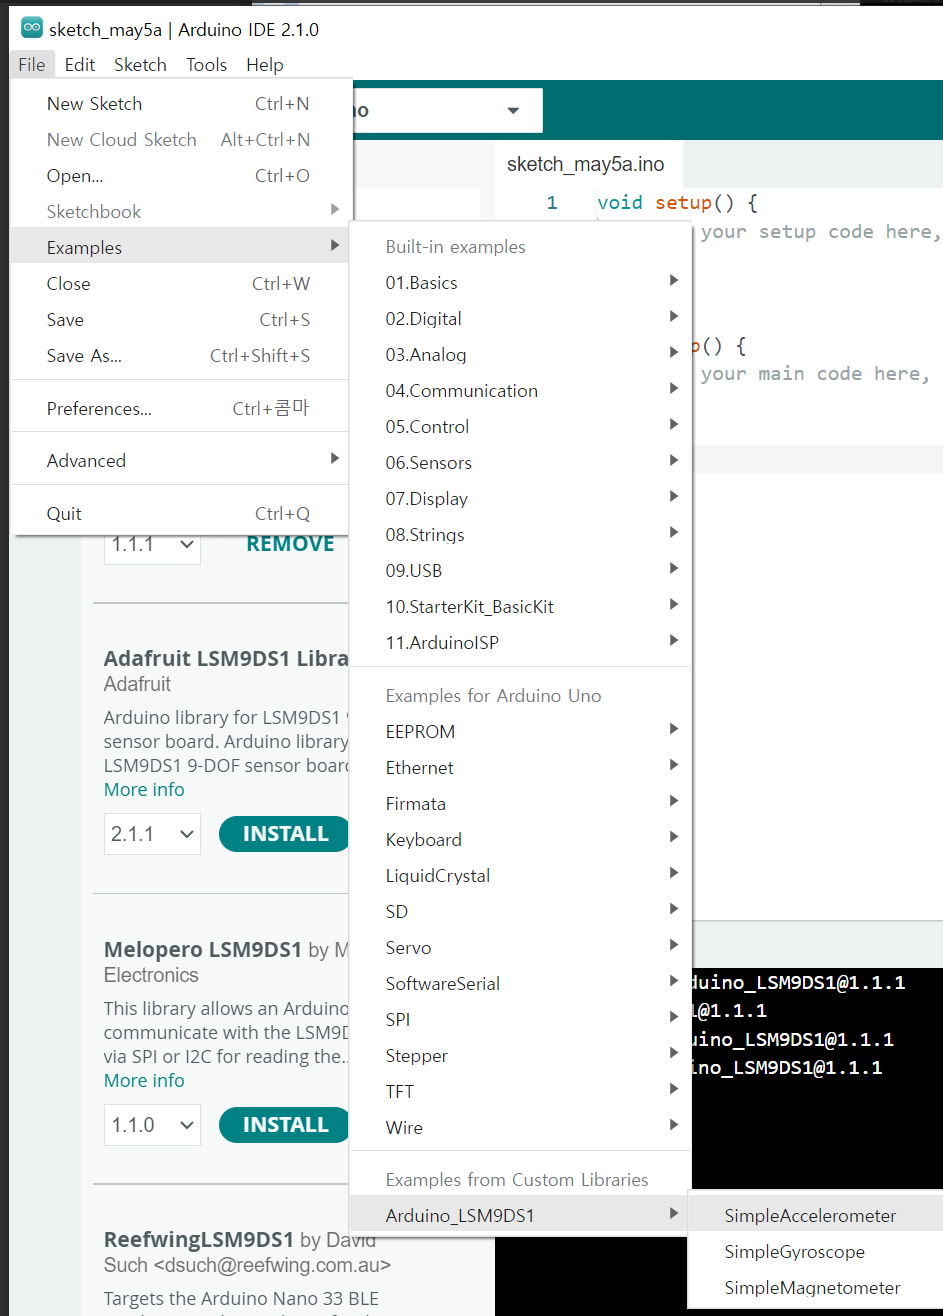
실행 위해 라이브러리 설치
LSM9DS1

예제파일 실행
– [File]→[Examples]→[Arduino_ LSM9DS1]→[SimpleAccelerometer]
Build and Upload the program.
->

시리얼 플루터 보기
– [Tools]→[Serial Plotter]

– Set the baud rate to 9600.
움직임의 경향성을 읽으려면 어떻게 해야할까.
IMU 센서 사용법
IMU센서 테스트 관련된 내용을 정리해 놓습니다. 참고로 아두이노, 프로세싱을 주로 사용하는 데, 이와 ...
blog.naver.com
위의 튜토리얼을 따라해보자
LSM9DS1 난 이 imu 인데
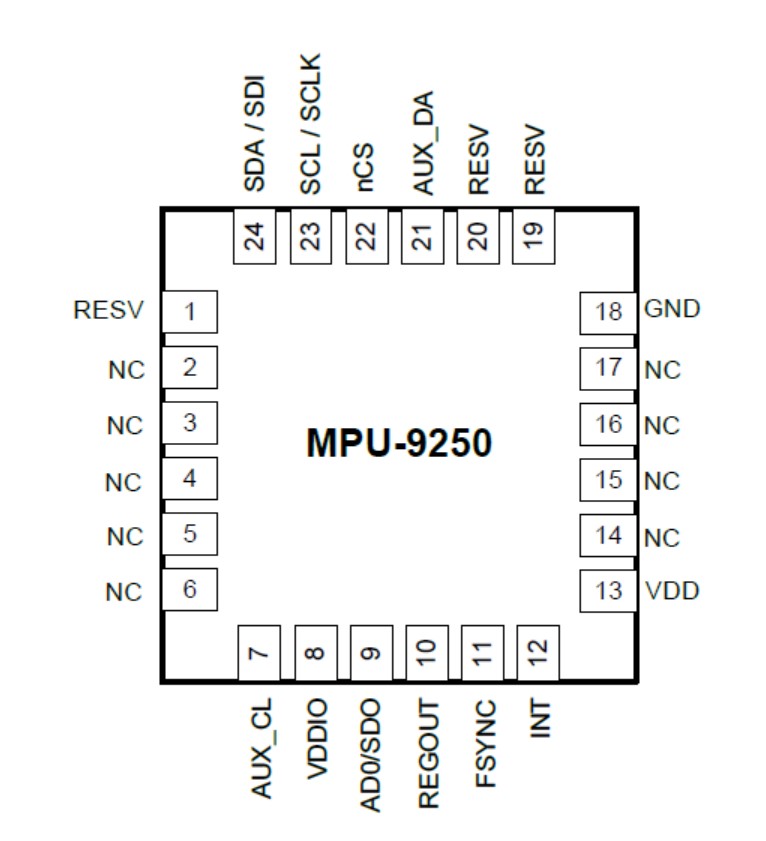
보통 mpu 9250 많이쓴다
자이로 센서는 ±250, 500, 1000, 2000 DPS(Degree per second) 해상도를 가진다. DPS는 초당 회전각으로 각속도이다. 각속도이므로, 가만이 두면 이 값은 0에 수렴한다.
[출처] IMU 센서 사용법|작성자 102MANIA
가속도 센서의 단위는 g이다. 가속도센서는 z축 방향으로 중력 가속도를 감지할 수 있다. 가속도 해상도는 ±2, 4, 8, 16g 이다. 센서를 흔들리지 않게 고정해 놓으면 x, y 값은 0에 근접하나 z축은 18,000 정도 값을 유지한다. 해상도 기본값이 ±2이므로, 값이 18,000이면 1g를 의미하는 것이다.
[출처] IMU 센서 사용법|작성자 102MANIA


https://github.com/curiores/ArduinoTutorials
GitHub - curiores/ArduinoTutorials
Contribute to curiores/ArduinoTutorials development by creating an account on GitHub.
github.com
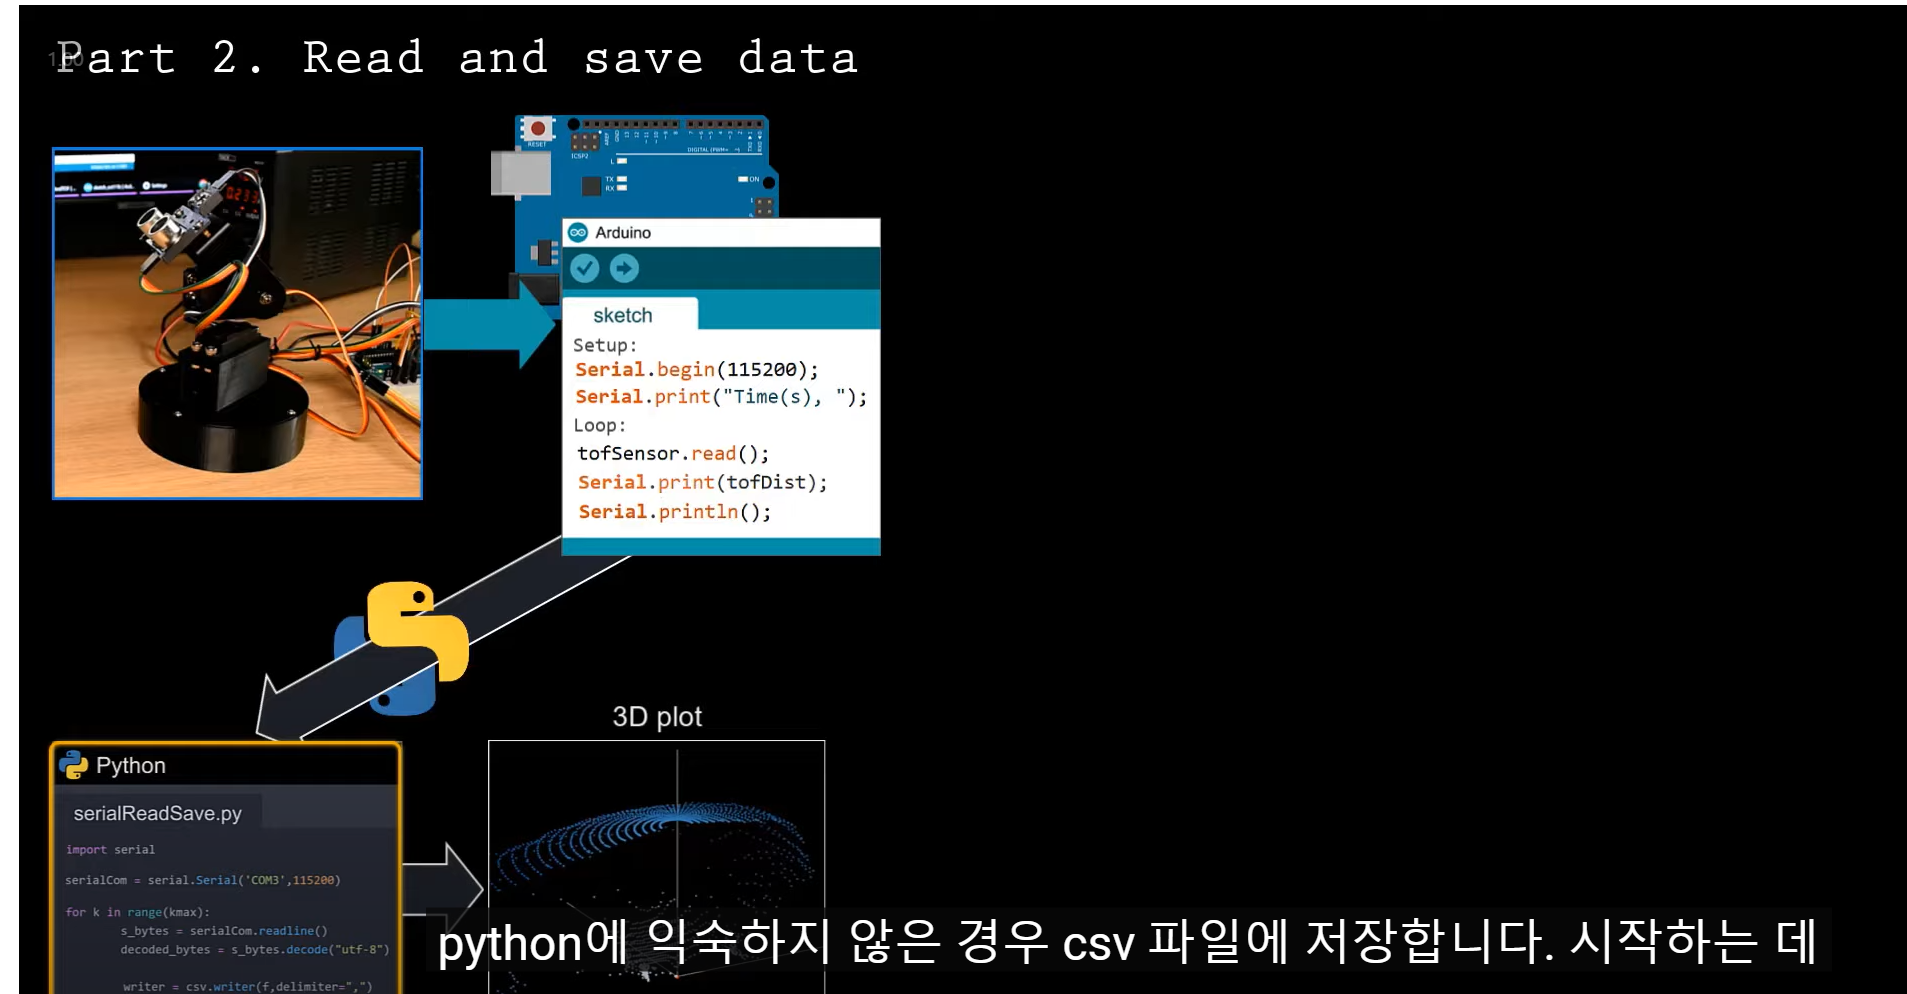
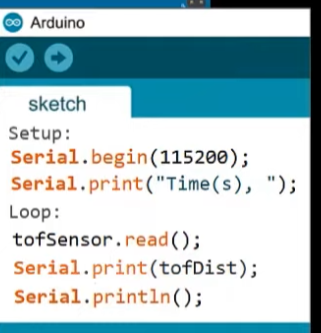
아두이노
// Libraries
#include <Servo.h>
#include <VL53L1X.h>
#include <Wire.h>
#include <HCSR04.h> // Include the HCSR04 header
// Define pins
#define PAN_SERVO 6
#define TILT_SERVO 5
#define TRIG 3
#define ECHO 2
// Globals
int panLim[] = {0,180};
int tiltLim[] = {0,90};
int pan = panLim[0];
int tilt = tiltLim[0];
int panIncrement = 1;
int tiltIncrement = 1;
Servo panServo;
Servo tiltServo;
VL53L1X tofSensor;
UltraSonicDistanceSensor ultrasonicSensor(TRIG, ECHO);
void setup() {
Serial.begin(115200);
Wire.begin();
Wire.setClock(400000); // use 400 kHz I2C
panServo.attach(PAN_SERVO);
tiltServo.attach(TILT_SERVO);
panServo.write(pan);
tiltServo.write(tilt);
delay(1000);
tofSensor.setTimeout(500);
if (!tofSensor.init())
{
Serial.println("Failed to detect and initialize sensor!");
}
tofSensor.setDistanceMode(VL53L1X::Long);
tofSensor.setMeasurementTimingBudget(50000);
tofSensor.startContinuous(50);
// Write header
Serial.print("Time(s), ");
Serial.print("Pan(degree), ");
Serial.print("Tilt(degree), ");
Serial.print("Ultrasonic(mm), ");
Serial.print("ToF(mm)");
Serial.println();
}
void loop() {
// Move to new position
pan = pan + panIncrement;
panServo.write(pan);
if(pan > panLim[1] || pan < panLim[0]){
panIncrement = -panIncrement;
tilt = tilt + tiltIncrement;
tiltServo.write(tilt);
if(tilt < tiltLim[0] || tilt > tiltLim[1] ){
tiltIncrement = -tiltIncrement;
}
}
delay(200); // give a little time to move
// Current time
float t = ((float) millis())/1000.0;
// Ultrasonic
float usDist = ultrasonicSensor.measureDistanceCm()*10.0;
// TOF
tofSensor.read();
float tofDist = tofSensor.ranging_data.range_mm;
// Print result
Serial.print(t);
Serial.print(" ");
Serial.print(pan);
Serial.print(" ");
Serial.print(tilt);
Serial.print(" ");
Serial.print(usDist);
Serial.print(" ");
Serial.print(tofDist);
Serial.print(" ");
Serial.println();
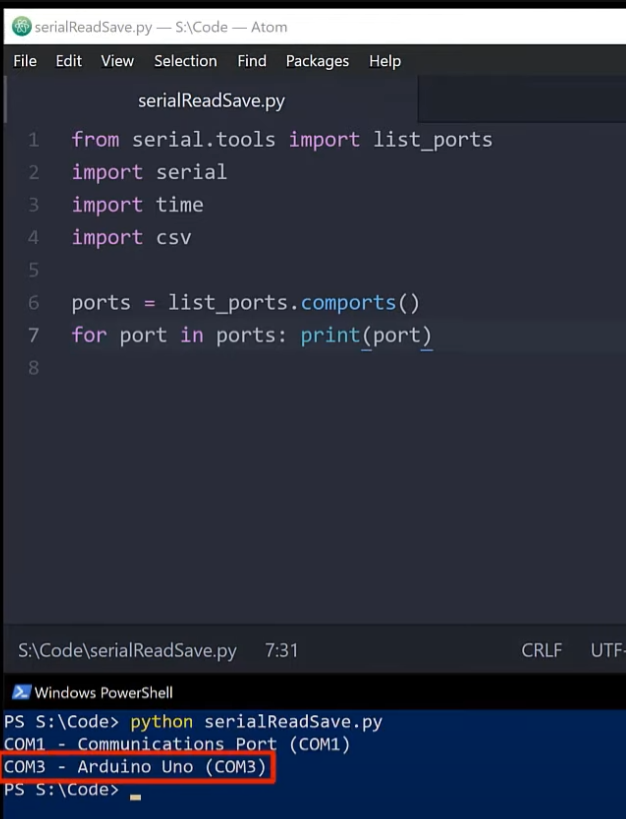
}파이썬
from serial.tools import list_ports
import serial
import time
import csv
# Identify the correct port
ports = list_ports.comports()
for port in ports: print(port)
# Create CSV file
f = open("data.csv","w",newline='')
f.truncate()
# Open the serial com
serialCom = serial.Serial('COM3',115200)
# Toggle DTR to reset the Arduino
serialCom.setDTR(False)
time.sleep(1)
serialCom.flushInput()
serialCom.setDTR(True)
# How many data points to record
kmax = 180*90
# Loop through and collect data as it is available
for k in range(kmax):
try:
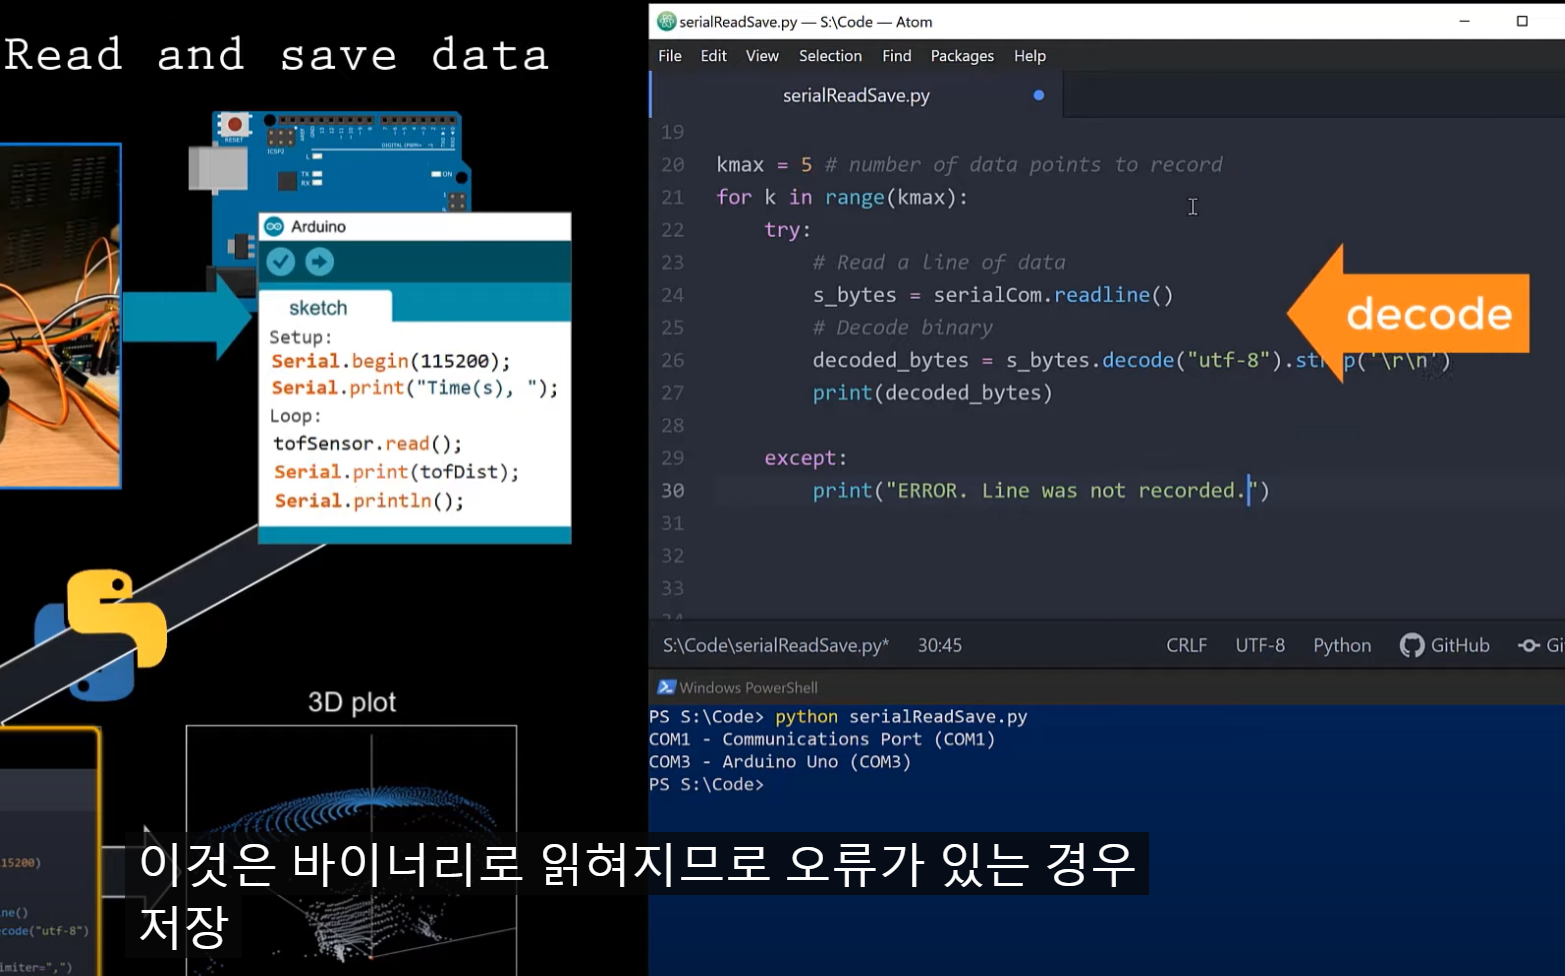
# Read the line
s_bytes = serialCom.readline()
decoded_bytes = s_bytes.decode("utf-8").strip('\r\n')
# print(decoded_bytes)
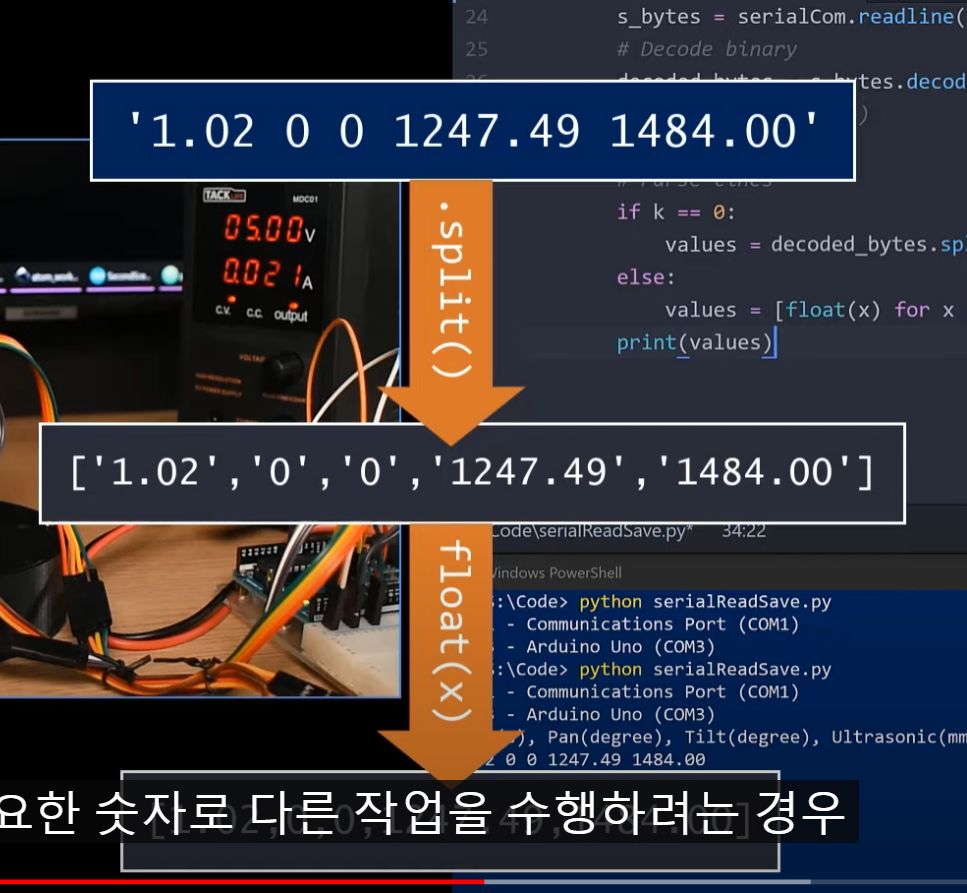
# Parse the line
if k == 0:
values = decoded_bytes.split(",")
else:
values = [float(x) for x in decoded_bytes.split()]
print(values)
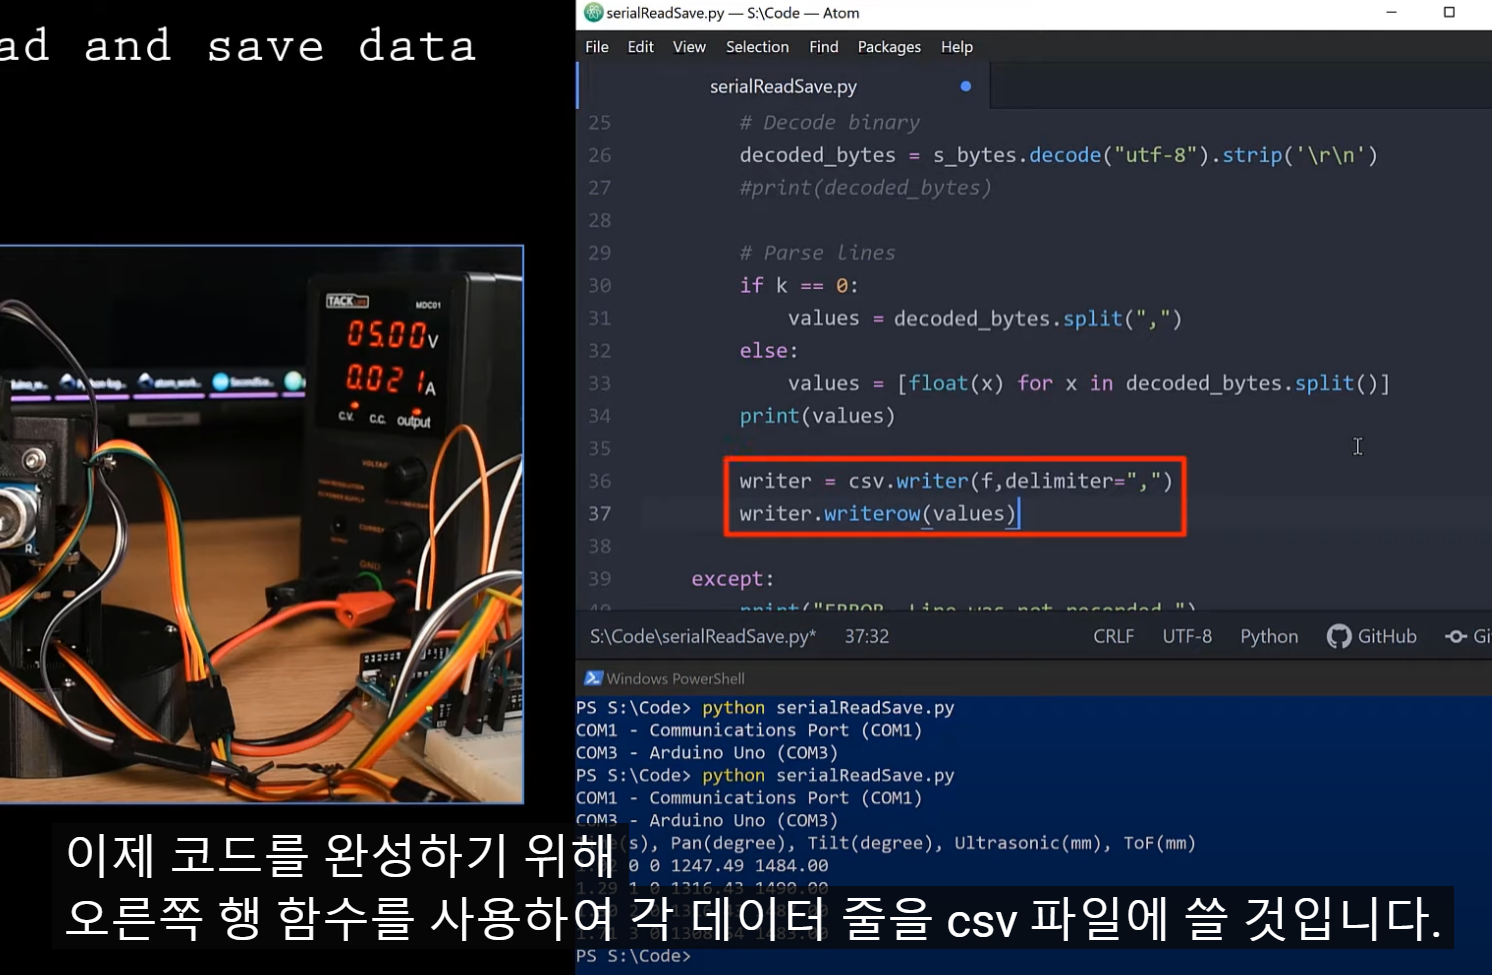
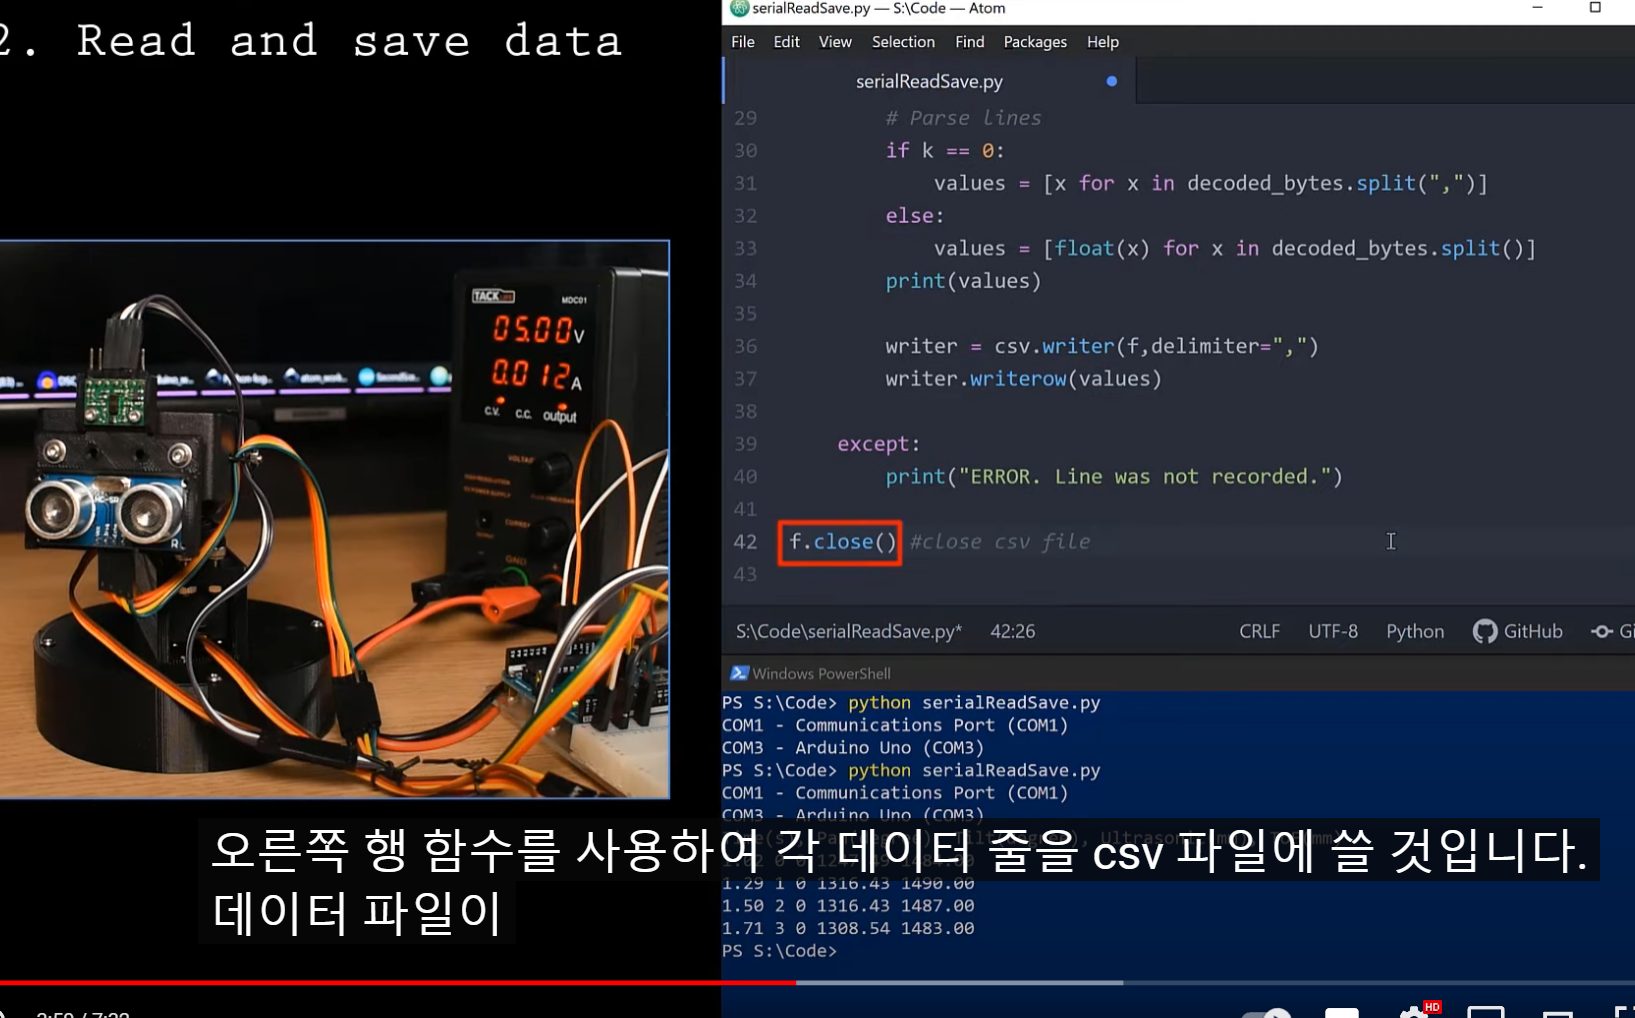
# Write to CSV
writer = csv.writer(f,delimiter=",")
writer.writerow(values)
except:
print("Error encountered, line was not recorded.")
f.close()LSM9DS1 이거 쓰는법..
(python환경)
https://github.com/adafruit/Adafruit_CircuitPython_LSM9DS1
'Iot > Arduino' 카테고리의 다른 글
| 아두이노 SEN-11574 맥박 PLUSE센서 (0) | 2024.01.08 |
|---|---|
| 아두이노 _ MLX90614 _ 비접촉 온도센서 (0) | 2024.01.08 |
| 아두이노 + GSR sensor + 서보모터 (0) | 2023.05.25 |
| Unity2021.3.11_win_Arduino (0) | 2023.05.11 |
| 아두이노 종류 + 파이썬 : 파이참으로 레드보드(아두이노) 제어하기 (1) | 2023.05.05 |
- Total
- Today
- Yesterday
- colab
- docker
- Python
- Arduino
- Midjourney
- houdini
- AI
- VFXgraph
- OpenClaw
- opticalflow
- 후디니
- Express
- MQTT
- TouchDesigner
- node.js
- CNC
- 라즈베리파이
- 4d guassian splatting
- VR
- RNN
- Java
- Unity
- sequelize
- three.js
- DeepLeaning
- ESP32
- 유니티
- opencv
- zclaw
- MCP
| 일 | 월 | 화 | 수 | 목 | 금 | 토 |
|---|---|---|---|---|---|---|
| 1 | 2 | 3 | 4 | |||
| 5 | 6 | 7 | 8 | 9 | 10 | 11 |
| 12 | 13 | 14 | 15 | 16 | 17 | 18 |
| 19 | 20 | 21 | 22 | 23 | 24 | 25 |
| 26 | 27 | 28 | 29 | 30 |