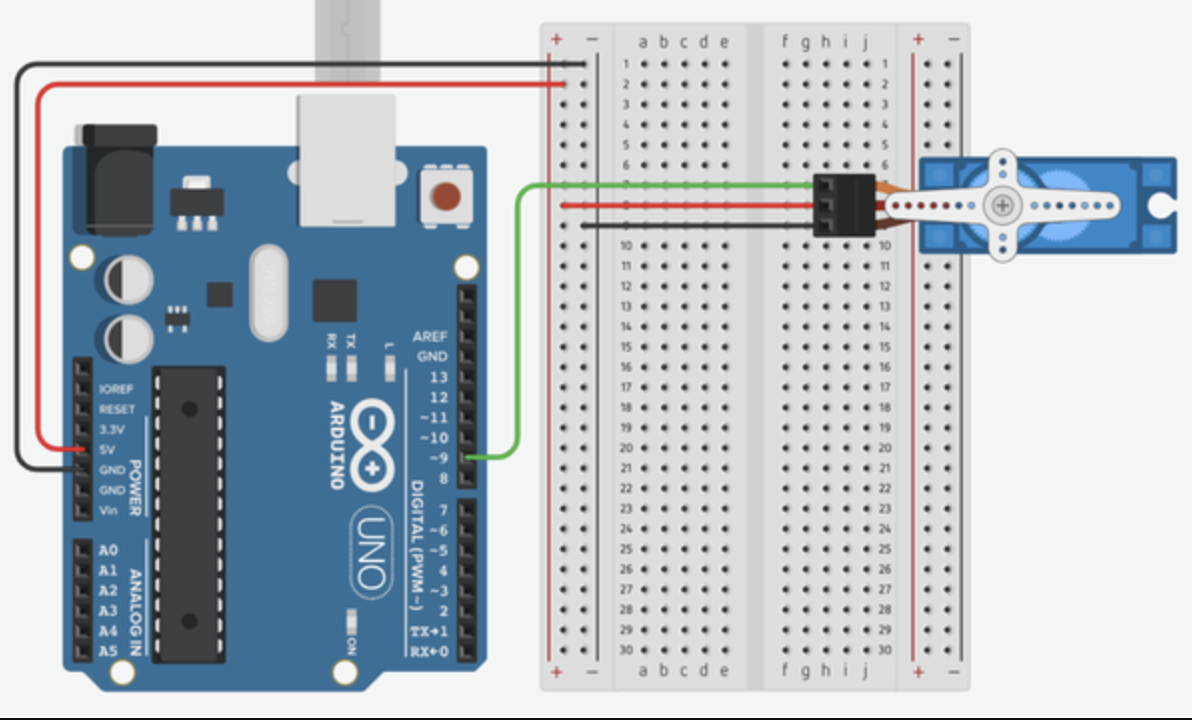
티스토리 뷰
#include <Servo.h>

Servo myServo;      // myServo 객체 생성
int potPin = A0;    // A0를 myServo의 입력핀으로 쓴다.
int potVal;         // potVal 변수에서 포텐셜미터의 입력값을 받는다.
int angle;          // myServo에 입력할 angle.

void setup() {
  myServo.attach(9);
}

void loop() {
  // potPin에서 받아온 포텐셜 미터의 입력 값을 PotVal에 저장
  potVal = analogRead(potPin);

  /* 중요 */
  // 포텐셜 미터의 입력값 potVal의 크기 범위 : 0 ~ 1023
  // 서보모터의 각도 입력값 angle의 범위 : 0 ~ 179
  // 따라서 아래와 같이 map 함수를 통해 potVal값의 크기의 비율을 조정하여 angle에 넣어줘야 한다.
  angle = map(potVal, 0, 1023, 0, 179);

 // 0~179 크기로 변환된 angle값을 서보모터에 입력을 준다.
  myServo.write(angle);
  delay(15);
}
: gsr 로 감정의 변화를 받아와 서보모터를 작동시켜 보자 !
https://igongam.tistory.com/28
아두이노 GSR센서 (거짓말탐지기센서)
아두이노와 GSR 센서를 이용해보기로 한다. GSR (glavantic skin reflex) 는 전기적 피부반사, 외적 자극이나 정서적인 흥분에 의해 활동전위가 발생하는 현상을 말한다. 이 현상은 피부에 전극을 대어
igongam.tistory.com
https://blog.naver.com/cktnals1224/222025562518
한국기계연구원 현장실습/GSR 센서
인생 첫 포스팅이자, 첫 현장실습 현풍에 위치한 한국기계연구원 첫날이라 박사님이 새로운 업무를 주지는 ...
blog.naver.com
GSR 센서
전기적 피부반사. 외적 자극이나 정서적 흥분에 의해 활동전위가 발생하는 현상.
피부에 전극을 부착해 측정.
감정 정서등 문제 연구할 때 쓰임.
아두이노
빨강 - 5v
검정 -gnd
노랑 -a2
하얀색 - 연결 x
const int GSR = A2;
int sensorValue = 0;
int gsr_average = 0;


void setup() {
  // put your setup code here, to run once:
  Serial.begin(9600);
}

void loop() {
  // put your main code here, to run repeatedly:
  long sum = 0;
  for(int i=0; i<10; i ++)
  {
    sensorValue = analogRead(GSR);
    sum += sensorValue;
    delay(5);
  }
  gsr_average = sum/10;
  Serial.print(gsr_average);
}
서보모터

각도의 범위는 0 에서 179도까지이다. -> 180 단계.
앞으로 한번 뒤로한번 코드
#include<Servo.h> //Servo 라이브러리를 추가
Servo servo;      //Servo 클래스로 servo객체 생성
int value = 0;    // 각도를 조절할 변수 value
int ii = 0;

const int GSR = A2;
int sensorValue = 0;
int gsr_average = 0;


void setup() {
  // put your setup code here, to run once:
  Serial.begin(9600);
  servo.attach(9);     //servo 서보모터 7번 핀에 연결
}

void loop() {
  // put your main code here, to run repeatedly:
  long sum = 0;
  for(int i=0; i<10; i ++)
  {
    sensorValue = analogRead(GSR);
    sum += sensorValue;
    delay(5);
  }
  gsr_average = sum/10;
  Serial.print(gsr_average);


  //서보
  for(ii = 0; ii < 180 ; ii++)
  {
    servo.write(ii);
    delay(30);
  }

  for(ii = 179; ii > 0; ii--) // ii-- : ii가 1씩 작아진다.
  {
    servo.write(ii);
    delay(30);
  }
}
https://cafe.naver.com/arduinostory/130532?art=ZXh0ZXJuYWwtc2VydmljZS1uYXZlci1zZWFyY2gtY2FmZS1wcg.eyJhbGciOiJIUzI1NiIsInR5cCI6IkpXVCJ9.eyJjYWZlVHlwZSI6IkNBRkVfVVJMIiwiY2FmZVVybCI6ImFyZHVpbm9zdG9yeSIsImFydGljbGVJZCI6MTMwNTMyLCJpc3N1ZWRBdCI6MTY4NTAwOTk0NjQzOX0.NYN6mBfh1DDaMzwI1Ls91oo3yq1K5ejsBdhMkJEDSj0
특정 값 이상으로 변하면
서보모터 작동하기
#include<Servo.h> //Servo 라이브러리를 추가
Servo servo;      //Servo 클래스로 servo객체 생성
int value = 0;    // 각도를 조절할 변수 value
int ii = 0;

const int GSR = A2;
int sensorValue = 0;
int threshold = 0;
int temp = 0;


void setup() {
  // put your setup code here, to run once:
  Serial.begin(9600);
  servo.attach(9);     //servo 서보모터 7번 핀에 연결

    long sum = 0;
  for(int i=0; i<500; i ++)
  {
    sensorValue = analogRead(GSR);
    sum += sensorValue;
    delay(5);
  }
  threshold = sum/500;
  Serial.print("Treshold=");
  Serial.println(threshold);
}

void loop() {
  // put your main code here, to run repeatedly:


//gsr change

  sensorValue=analogRead(GSR);

  Serial.print("sensorValue=");

  Serial.println(sensorValue);

  temp = threshold - sensorValue;

  if(abs(temp)>60)

  {

    sensorValue=analogRead(GSR);

    temp = threshold - sensorValue;

    if(abs(temp)>50){

      //서보
      for(ii = 0; ii < 80 ; ii++)
      {
        servo.write(ii);
        delay(30);
      }

      Serial.print("Emotion Changes Detected!");

      delay(3000);

      for(ii = 79; ii > 0; ii--) // ii-- : ii가 1씩 작아진다.
      {
        servo.write(ii);
        delay(30);
      }

      delay(1000);

   }

  }


}
특정 GSR 값에 움직임을 맵핑할 수 도 있다.
#include <Servo.h>

Servo servo;
int value = 0;

const int GSR = A2;
int sensorValue = 0;
int threshold = 0;
int previousEmotion = 0;

void setup() {
  Serial.begin(9600);
  servo.attach(9);

  long sum = 0;
  for (int i = 0; i < 500; i++) {
    sensorValue = analogRead(GSR);
    sum += sensorValue;
    delay(5);
  }
  threshold = sum / 500;
  Serial.print("Threshold=");
  Serial.println(threshold);
}

void loop() {
  sensorValue = analogRead(GSR);
  Serial.print("sensorValue=");
  Serial.println(sensorValue);
  int emotion = map(sensorValue, 0, 1023, 0, 180);

  if (abs(emotion - previousEmotion) > 10) {
    servo.write(emotion);
    delay(500);
    previousEmotion = emotion;
  }
}
그래프 그리기
https://m.blog.naver.com/darknisia/221715313000
[질의응답 정리] 3. 시리얼 플로터(Serial Plotter, 아두이노 그래프)
간혹 이런 질문이 많이 들어온다. 아두이노로 그래프를 그릴 수 있나요? 아두이노의 시리얼 플로터에 여러 ...
blog.naver.com
Serial.print(a);
Serial.print(',');
Serial.println(b);
'Iot > Arduino' 카테고리의 다른 글
| 아두이노 SEN-11574 맥박 PLUSE센서 (0) | 2024.01.08 |
|---|---|
| 아두이노 _ MLX90614 _ 비접촉 온도센서 (0) | 2024.01.08 |
| Unity2021.3.11_win_Arduino (0) | 2023.05.11 |
| IMU + 아두이노에서 데이터 처리하기 python (0) | 2023.05.05 |
| 아두이노 종류 + 파이썬 : 파이참으로 레드보드(아두이노) 제어하기 (1) | 2023.05.05 |
- Total
- Today
- Yesterday
- AI
- ai film
- Java
- Python
- opticalflow
- RNN
- VR
- TouchDesigner
- 라즈베리파이
- colab
- houdini
- sequelize
- opencv
- CNC
- krea
- Express
- VFXgraph
- Unity
- MCP
- 4d guassian splatting
- three.js
- node.js
- Midjourney
- 유니티
- Arduino
- 4dgs
- MQTT
- 후디니
- DeepLeaning
- docker
| 일 | 월 | 화 | 수 | 목 | 금 | 토 |
|---|---|---|---|---|---|---|
| 1 | 2 | 3 | 4 | 5 | 6 | 7 |
| 8 | 9 | 10 | 11 | 12 | 13 | 14 |
| 15 | 16 | 17 | 18 | 19 | 20 | 21 |
| 22 | 23 | 24 | 25 | 26 | 27 | 28 |
