
티스토리 뷰
728x90
https://blog.naver.com/msyang59/220125925709
조도 센서 BH1750을 붙이다
아두이노에 빛의 밝기를 측정하는 조도(照度) 센서 BH1750를 탑재한 GY-302 모듈을 붙여 보았습...
blog.naver.com
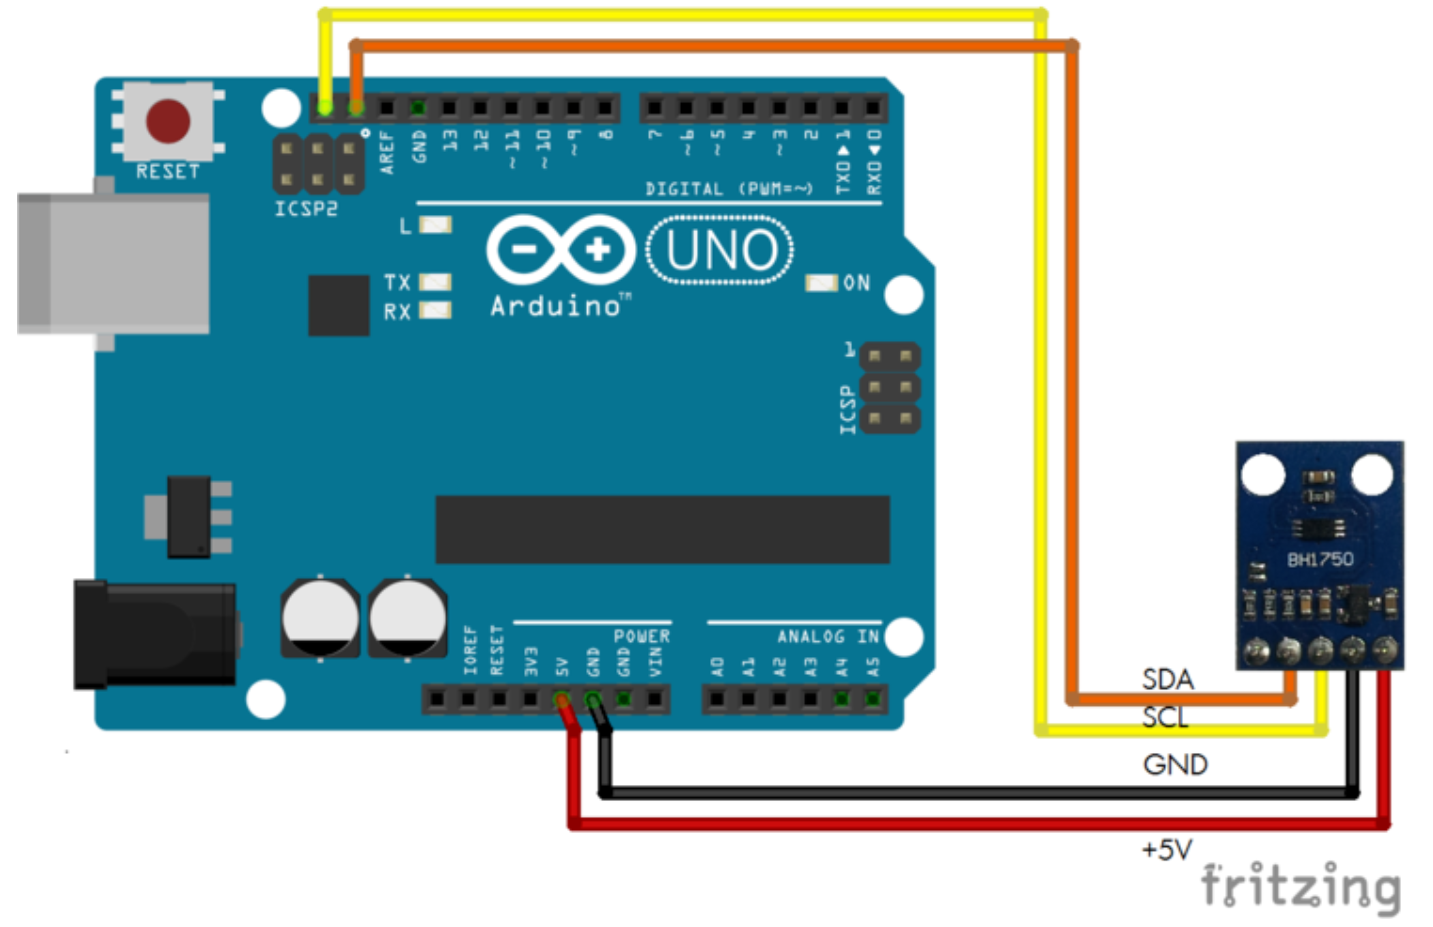
BH1750 센서를 탑재한 GY-302 모듈
I2C 버스 인터페이스를 사용

원본 라이브러리는 Claws라는 분의 것을 다운로드 받아 이를 조금 수정하였고, 예제도 약간 바꿨습니다. 원본은 ☞ https://github.com/claws/BH1750
[출처] 조도 센서 BH1750을 붙이다|작성자 과객
/*

조도 센서 BH1750 라이브러리를 사용한 예제입니다.

이 예제는 BH1750 조도 센서를 One Time H-Resolution Mode 2를 이용하여
조도를 측정하여 이를 시리얼 모니터로 출력하고, 1초후에 반복 측정하는
스케치입니다.

다음과 같은 모드들이 있습니다. 한번 모드들을 시험하여 보기 바랍니다.

BH1750_CONTINUOUS_HIGH_RES_MODE    분해능이 1 Lux인 연속 측정 모드
BH1750_CONTINUOUS_HIGH_RES_MODE_2  분해능이 0.5 Lux인 연속 측정 모드
BH1750_CONTINUOUS_LOW_RES_MODE     분해능이 4 Lux인 연속 측정 모드
BH1750_ONE_TIME_HIGH_RES_MODE      분해능이 1 Lux인 한번 측정 모드
BH1750_ONE_TIME_HIGH_RES_MODE_2    분해능이 0.5 Lux인 한번 측정 모드
BH1750_ONE_TIME_LOW_RES_MODE       분해능이 4 Lux인 한번 측정 모드

연결:

 BHC1750    아두이노
 ======= -  ========
   VCC   -    5v
   GND   -    GND
   SCL   -    SCL(아날로그 5번 핀 혹은 SCL 핀)
   SDA   -    SDA(아날로그 4번 핀 혹은 SDA 핀)
   ADDR  -    연결하지 않거나 GND로 연결

*/

#include <Wire.h>
#include <BH1750.h>

// 조도센서 객체를 정의합니다
BH1750 lightMeter;

void setup(){
  // 시리얼 모니터로 출력하기 위하여 시리얼 포트를 초기화를 합니다
  Serial.begin(9600);
  // 분해능이 0.5 Lux 이고 한번만 읽는 모드로 설정합니다.
  lightMeter.begin(BH1750_ONE_TIME_HIGH_RES_MODE_2);
  Serial.println("실행...");
}

void loop() {

  // 조도센서로부터 측정한 조도 값을 읽습니다:
  uint16_t lux = lightMeter.readLightLevel();
  // 이를 시리얼 모니터로 출력합니다
  Serial.print("조도: ");
  Serial.print(lux);
  Serial.println(" lx");
  // 1초 동안 기다렸다가 반복합니다
  delay(1000);
}
[출처] 조도 센서 BH1750을 붙이다|작성자 과객
/*
Example of BH1750 library usage.
This example initialises the BH1750 object using the default high resolution
continuous mode and then makes a light level reading every second.
Connection:
VCC -> 3V3 or 5V
GND -> GND
SCL -> SCL (A5 on Arduino Uno, Leonardo, etc or 21 on Mega and Due, on esp8266 free selectable)
SDA -> SDA (A4 on Arduino Uno, Leonardo, etc or 20 on Mega and Due, on esp8266 free selectable)
ADD -> (not connected) or GND
ADD pin is used to set sensor I2C address. If it has voltage greater or equal to
0.7VCC voltage (e.g. you've connected it to VCC) the sensor address will be
0x5C. In other case (if ADD voltage less than 0.7 * VCC) the sensor address will
be 0x23 (by default).
*/
#include <Wire.h>
#include <BH1750.h>
BH1750 lightMeter;
void setup(){
Serial.begin(115200);
// Initialize the I2C bus (BH1750 library doesn't do this automatically)
Wire.begin();
// On esp8266 you can select SCL and SDA pins using Wire.begin(D4, D3);
lightMeter.begin();
Serial.println(F("BH1750 Test begin"));
}
void loop() {
int cdsValue = analogRead(A0);
float lux = lightMeter.readLightLevel();
Serial.print("Light: ");
Serial.print(lux);
Serial.print(" lx\t");
Serial.print("Cds: ");
Serial.println(cdsValue);
delay(1000);
}728x90
'Iot' 카테고리의 다른 글
| 아두이노 나노 33 IOT _ UART ? (0) | 2024.04.19 |
|---|---|
| 아두이노 -GPS 센서 (GY-NEO6MV2) (1) | 2024.04.18 |
| 아두이노_온습도센서 : DHT sensor (0) | 2024.04.17 |
| 아두이노_ Micro SD Card_ 비접촉 온도센서(MLX90614) .csv 기록 + OLED 스크린 (0) | 2024.04.12 |
| SparkFun 로직 레벨 컨버터: 레벨 시프트(TXS0108) (2) | 2024.04.12 |
250x250
공지사항
최근에 올라온 글
최근에 달린 댓글
- Total
- Today
- Yesterday
링크
TAG
- zclaw
- sequelize
- VFXgraph
- three.js
- docker
- Express
- Unity
- 후디니
- opencv
- OpenClaw
- MCP
- ESP32
- 4d guassian splatting
- Arduino
- VR
- opticalflow
- RNN
- node.js
- MQTT
- colab
- CNC
- DeepLeaning
- 라즈베리파이
- TouchDesigner
- houdini
- 유니티
- Midjourney
- Java
- AI
- Python
| 일 | 월 | 화 | 수 | 목 | 금 | 토 |
|---|---|---|---|---|---|---|
| 1 | 2 | 3 | 4 | |||
| 5 | 6 | 7 | 8 | 9 | 10 | 11 |
| 12 | 13 | 14 | 15 | 16 | 17 | 18 |
| 19 | 20 | 21 | 22 | 23 | 24 | 25 |
| 26 | 27 | 28 | 29 | 30 |
글 보관함