
티스토리 뷰
728x90


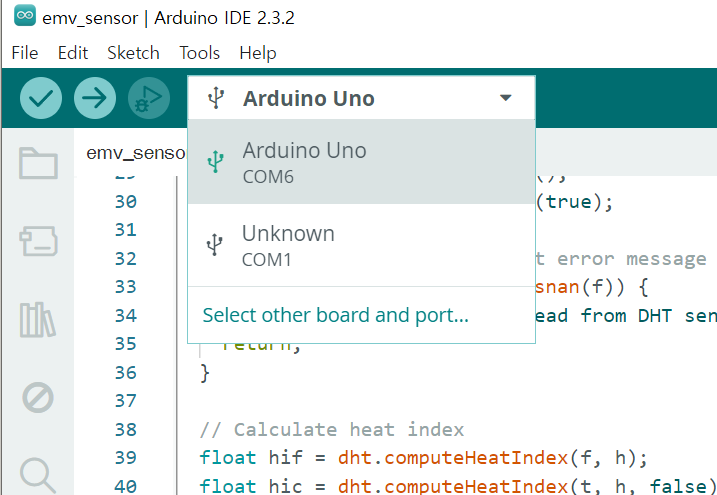
아두이노 : 시리얼 통신 위한 코드 작성
#include <Wire.h>
#include <BH1750.h>
#include "DHT.h"

#define DHTPIN 2
#define DHTTYPE DHT22

BH1750 lightMeter;
DHT dht(DHTPIN, DHTTYPE);

void setup() {
  Serial.begin(9600);

  // Initialize illuminance sensor
  lightMeter.begin(BH1750::ONE_TIME_HIGH_RES_MODE_2);

  // Initialize temperature and humidity sensor
  dht.begin();

  Serial.println("Running...");
}

void loop() {
  // Measure illuminance
  uint16_t lux = lightMeter.readLightLevel();

  // Measure temperature and humidity
  float h = dht.readHumidity();
  float t = dht.readTemperature();
  float f = dht.readTemperature(true);

  // If measurement fails, print error message and repeat
  if (isnan(h) || isnan(t) || isnan(f)) {
    Serial.println("Failed to read from DHT sensor!");
    return;
  }

  // Calculate heat index
  float hif = dht.computeHeatIndex(f, h);
  float hic = dht.computeHeatIndex(t, h, false);

  // Print measurement results
  Serial.print("Illuminance: ");
  Serial.print(lux);
  Serial.print(" lx, ");

  Serial.print("Humidity: ");
  Serial.print(h);
  Serial.print("%, Temperature: ");
  Serial.print(t);
  Serial.print("°C ");
  Serial.print(f);
  Serial.print("°F, Heat index: ");
  Serial.print(hic);
  Serial.print("°C ");
  Serial.print(hif);
  Serial.println("°F");


  // Wait for 1 second and repeat
  delay(1000);

  // Set illuminance sensor to one-time measurement mode again
  lightMeter.configure(BH1750::ONE_TIME_HIGH_RES_MODE_2);
}
https://ing-min.tistory.com/244
아두이노_온습도센서 : DHT sensor
https://milkye.tistory.com/37 아두이노 온습도 센서 사용법! [아두이노] 온습도 센서 사용법 아두이노를 사용하여 온도/습도를 확인할 수 있는 방법입니다.다음의 회로도를 참고하여 아두이노와 점프
ing-min.tistory.com
https://ing-min.tistory.com/245
아두이노 - GY-302 BH1750 조도센서
https://blog.naver.com/msyang59/220125925709 조도 센서 BH1750을 붙이다 아두이노에 빛의 밝기를 측정하는 조도(照度) 센서 BH1750를 탑재한 GY-302 모듈을 붙여 보았습... blog.naver.com BH1750 센서를 탑재한 GY-302 모
ing-min.tistory.com
터치디자이너 : 시리얼 통신을 위한 OP
Serial
:Port 설정 , 아두이노와 같이 com6으로 맞추기
(**이때 아두이노의 시리얼 모니터가 켜져있으면 안됨.)

들어온 값 정리하는 table 만들기
# me - this DAT
#
# dat - the DAT that received the data
# rowIndex - the row number the data was placed into
# message - an ascii representation of the data
#           Unprintable characters and unicode characters will
#           not be preserved. Use the 'bytes' parameter to get
#           the raw bytes that were sent.
# bytes - byte array of the data received
import re
def onReceive(dat, rowIndex, message, bytes):
    message = bytes.decode('utf-8')

    # 데이터 형식 처리
    match = re.search(r'Illuminance: (\d+) lx, Humidity: (\d+\.\d+)%, Temperature: (\d+\.\d+)°C \d+\.\d+°F, Heat index: (\d+\.\d+)°C \d+\.\d+°F', message)
    if match:
        values = match.groups()

        # 'table1'에 데이터 추가
        op('table1').appendRow(values)

    return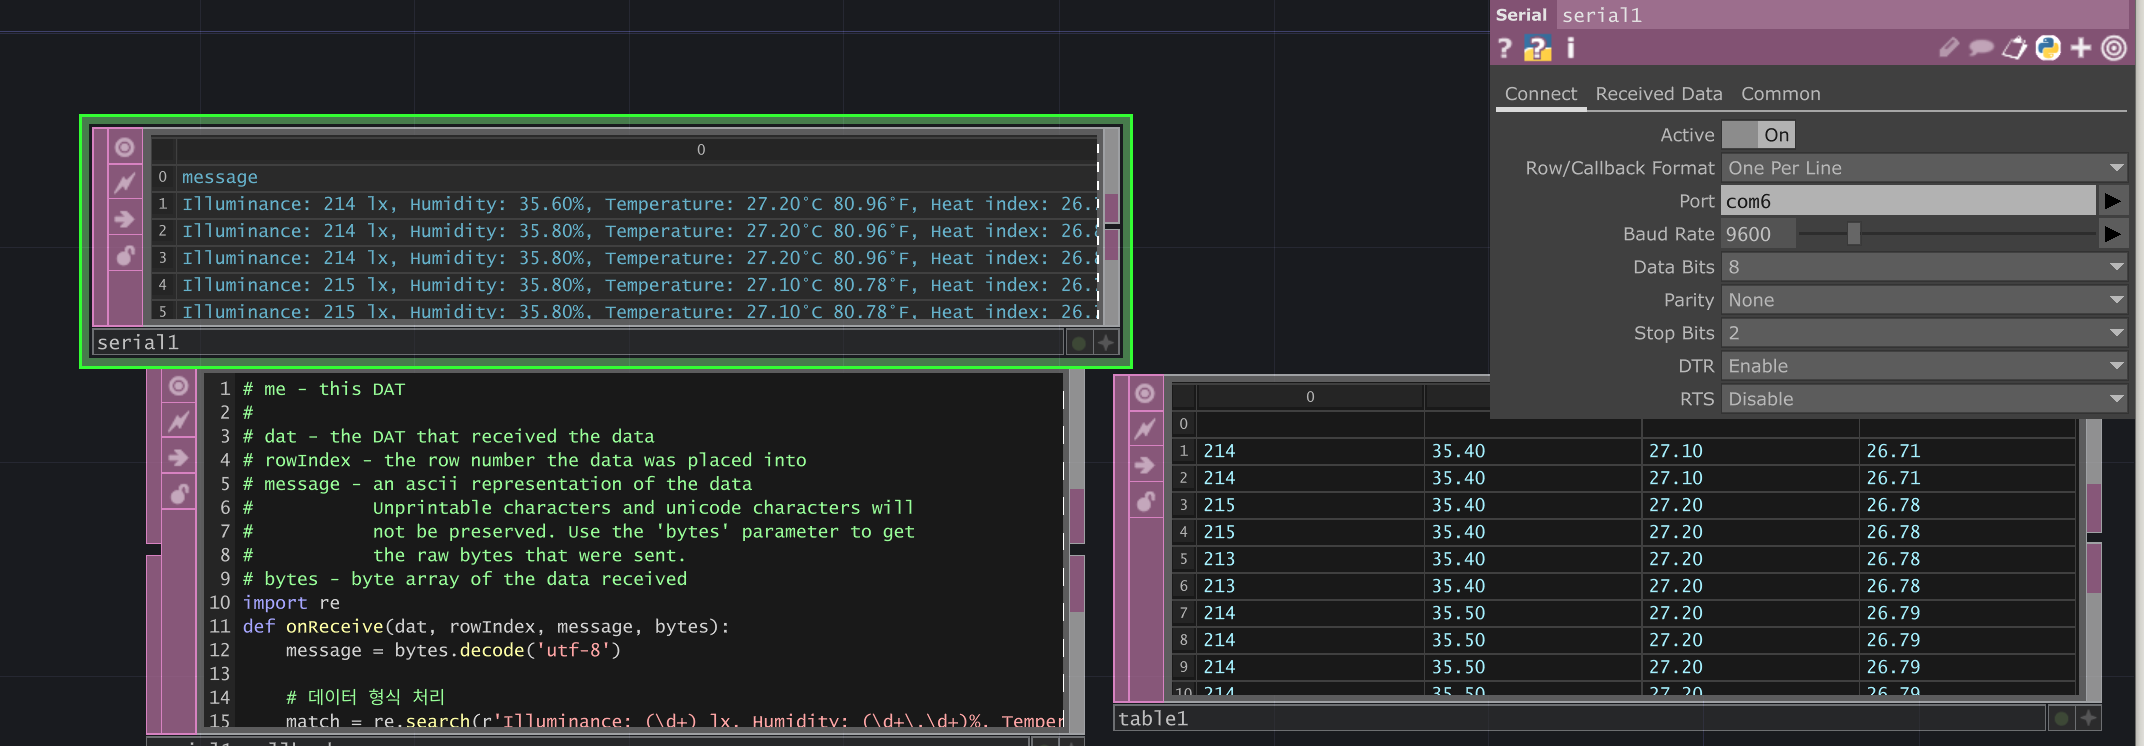
728x90
'TouchDesigner' 카테고리의 다른 글
| TOUCHDESIGNER _ RANDOM GENERATOR (0) | 2024.04.25 |
|---|---|
| 아두이노 나노 33 IoT _ 온습도, 조도,WIFI,GPS,OLED,TEMP,PULSE_SDcard_MQTT_TouchDesigner_00 (0) | 2024.04.24 |
| TouchDesinger_motor_arduino (0) | 2024.03.30 |
| Touchdesigner_ AI model 불러오기 (.pth) (0) | 2024.03.17 |
| Touchdesigner _ StableDiffusion :Comfy UI (0) | 2024.03.16 |
250x250
공지사항
최근에 올라온 글
최근에 달린 댓글
- Total
- Today
- Yesterday
링크
TAG
- zclaw
- node.js
- opencv
- VR
- VFXgraph
- 4d guassian splatting
- sequelize
- docker
- 유니티
- CNC
- Arduino
- 라즈베리파이
- Express
- TouchDesigner
- ESP32
- Unity
- AI
- opticalflow
- colab
- Java
- MCP
- RNN
- MQTT
- Midjourney
- OpenClaw
- houdini
- three.js
- 후디니
- Python
- DeepLeaning
| 일 | 월 | 화 | 수 | 목 | 금 | 토 |
|---|---|---|---|---|---|---|
| 1 | 2 | 3 | 4 | |||
| 5 | 6 | 7 | 8 | 9 | 10 | 11 |
| 12 | 13 | 14 | 15 | 16 | 17 | 18 |
| 19 | 20 | 21 | 22 | 23 | 24 | 25 |
| 26 | 27 | 28 | 29 | 30 |
글 보관함