

티스토리 뷰
https://ing-min.tistory.com/49
https://ing-min.tistory.com/92
: 참고 링크
<TEST>
1-1. Desktop 모스키토 실행

(모스키토 config 수정해준다) : 포트 설정 / ...

# listener port-number [ip address/host name/unix socket path]
#listener
listener 1883
# listener 8883
# protocol mqtt
listener 8088
protocol websockets
1-2 라즈베리파이 모스키토 confg **********
나는 브로커 : 모스키토를 라즈베리파이에서 띄울 거다!!! 따라서 위의 윈도우 모스키토 설정은 안 해도 된다.
아래의 라즈베리 경로에서만 mosquitto.conf 파일 수정해준다.
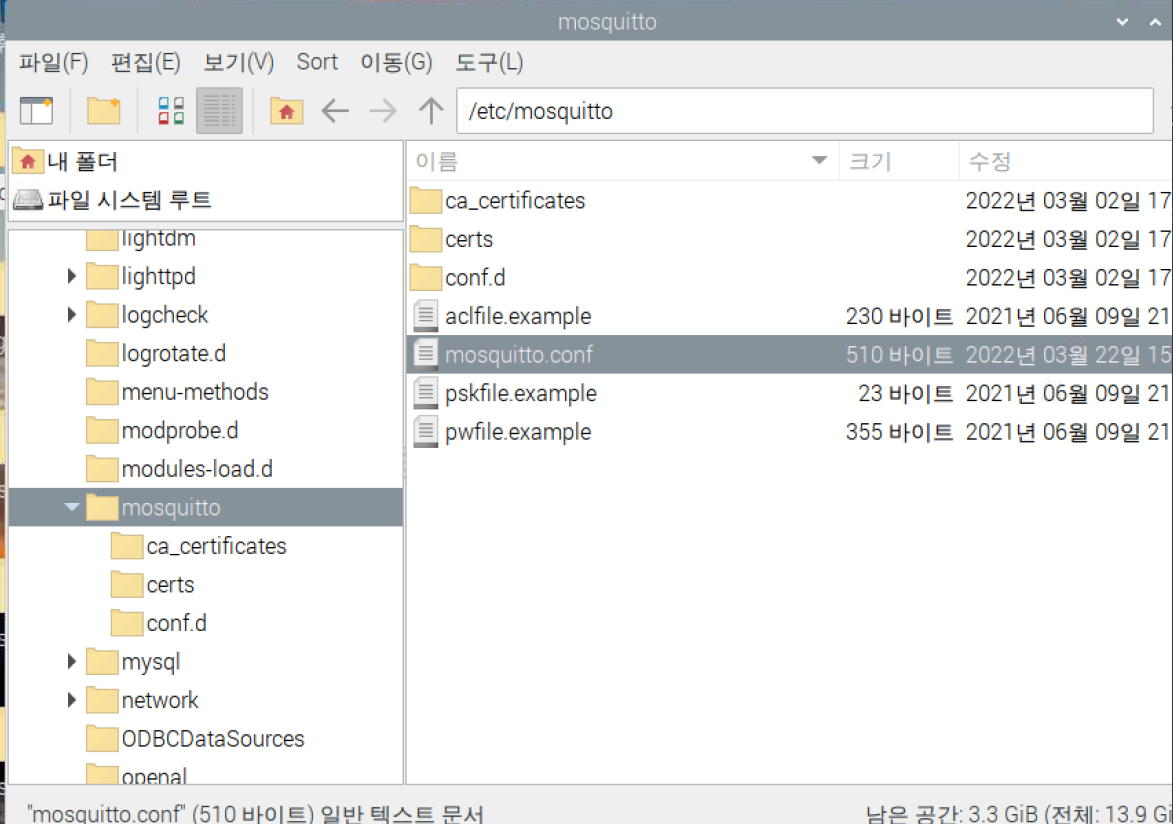
sudo nano mosquitto.confnano로 수정할 수 있다. 관리자 권한으로 수정해야 함 sudo
******vue랑 연결하기 위해서는 websocket으로 연결되어있어야 한다!!!!!!!!!!!!!!!!!!!!!!!!!!!!!!!!!!!!!!
>> 아래의
listener 8088
protocol websockets
이 부분이 중요하다 ***
# Place your local configuration in /etc/mosquitto/conf.d/
#
# A full description of the configuration file is at
# /usr/share/doc/mosquitto/examples/mosquitto.conf.example

pid_file /run/mosquitto/mosquitto.pid

persistence true
persistence_location /var/lib/mosquitto/

log_dest topic

log_type error
log_type warning
log_type notice
log_type information


connection_messages true
log_timestamp true

include_dir /etc/mosquitto/conf.d

listener 1883
listener 8088
protocol websockets

allow_anonymous true
***모스퀴토 서비스 재시작하여 바뀐 값을 적용시킨다.
systemctl status mosquitto.service

systemctl reload mosquitto.service
systemctl restart mosquitto.service

systemctl status mosquitto.service
q
라즈베리파이에서 퍼블리쉬해주는 코드
> publish.py
import paho.mqtt.client as mqtt
import json


def on_connect(client, userdata, flags, rc):
    #connection check ### 0 : connected
    if rc == 0:
        print("connected OK")
    else:
        print("Bad connection Returned code=", rc)


def on_disconnect(client, userdata, flags, rc=0):
    print(str(rc))


def on_publish(client, userdata, mid):
    print("In on_pub callback mid= ", mid)


# 새로운 클라이언트 생성
client2 = mqtt.Client()
# 콜백 함수 설정 on_connect(브로커에 접속), on_disconnect(브로커에 접속중료), on_publish(메세지 발행)
client2.on_connect = on_connect
client2.on_disconnect = on_disconnect
client2.on_publish = on_publish
# address : "192.168.43.158", port: 1883 에 연결
client2.connect('localhost', 1883)
client2.loop_start()
# common topic 으로 메세지 발행
##
#토픽 ,메세지,012 qos
client2.publish('rasp', "1234", 1)

client2.loop_forever()
# client2.loop_stop()
# # 연결 종료
# client2.disconnect()
실행 : python3 publish.py
(2. mqtt box로 확인) : 확인용

값 잘 받아와 진다.(토픽 기억 안 나면 #으로 적으면 모든 값 받을 수 있다.)
설정값이 중요 :
주소 : 라즈베리파이 서버 : 1883
프로토콜은 mqtt

(2-2. Desktop콘솔 창에서 확인)

(대부분 여기까지밖에 설명이 없다...........)
< Vue.js 프런트에 연결해 주려면!...? >
(프런트 작업된 폴더에서 : 아래의 글을 확인한다 *버전 중요*)
https://ing-min.tistory.com/31?category=1052709
Vue_시작하기
[작업 환경 만들기] 0.node 설치(14.18.2 버전) https://nodejs.org/ko/download/releases/ 이전 릴리스 | Node.js Node.js® is a JavaScript runtime built on Chrome's V8 JavaScript engine. nodejs.org 윈도..
ing-min.tistory.com
1. mqtt 설치
npm install mqtt
2. Vue 파일 생성
> BS-mqtt.vue
<template>
  <div>
    <h1>MQTT 테스트</h1>
    {{ mqttData }}
  </div>
</template>

<script>
import mqtt from 'mqtt'
// import { connect } from '../mqtt_test'

export default {
  data() {
    return {
      mqttTopic: 'rasp/1',
      mqttDataList: [] // mqtt를 통해 받은 데이터 (리스트로 계속 추가됨)
    }
  },
  mounted() {
    this.createMqtt()
  },
  methods: {
    createMqtt() {
      // mqtt 연결
      const mqttClient = mqtt.connect(process.env.MQTT)

      mqttClient.on('connect', () => {
        // mqtt 연결 시 구독한다.
        const topic = this.mqttTopic // 구독할 topic
        mqttClient.subscribe(topic, {}, (error, res) => {
          if (error) {
            console.error('mqtt client error', error)
          }
        })
      })

      // 메시지 실시간 수신
      mqttClient.on('message', (topic, message) => {
        const mqttData = JSON.parse(message) // json string으로만 받을 수 있음
        this.mqttDataList.push(mqttData) // 리스트에 계속 추가함
        console.log(mqttData)
      })
    }
  }
}
</script>

<style lang="scss" scoped></style>
***브로커 주소 알아야 한다!! : 라즈베리파이 서버 주소 : 8088
(나는 .env 파일 환경변수에 주소를 적어 노출되지 않게 했다.)
VUE_APP_MQTT=mqtt://111.11.111.11:8088포트는 위에 모스키토 컨피그 파일에서 지정한 포트로 해야 한다!! 1883 말고
const mqttClient = mqtt.connect(process.env.VUE_APP_MQTT)이렇게 mqtt.connect(주소) 하면 연결된다.
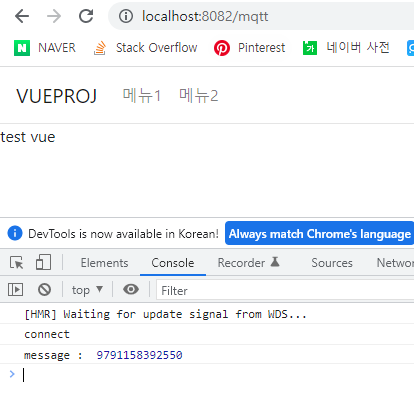
<OUTPUT>
localhost:8082/mqtt에 접속하여
f12 콘솔 창 보면 값을 잘 받아오는 걸 확인할 수 있다.
참고 ))) mqtt.vue를 router에 연결 (구조)

>router > index.js
import Vue from 'vue'
import VueRouter from 'vue-router'
const mqtt = import('../views/BS-mqtt.vue')

Vue.use(VueRouter)

const routes = [
  {
    path: '/',
    redirect: '/home',
    component: () => import('../views/BS-index.vue'),
    children: [
      {
        path: '/home',
        component: () => import('../views/BS-index.vue')
      }
    ]
  },
  {
    path: '/review',
    component: () => import('../views/BS-review.vue')
  },
  {
    path: '/regi',
    component: () => import('../views/BS-regi.vue'),
    meta: { write: false }
  },
  {
    path: '/mqtt',
    component: mqtt
  },
  {
    // path: '*'는 not found route 처리를 위한 것으로 항상 routes 배열 최하단에 위치해 있어야 합니다.
    path: '*',
    component: () => import('../components/NotFound.vue'),
    meta: { header: false }
  }
]

const router = new VueRouter({
  mode: 'history',
  base: process.env.BASE_URL,
  routes
})

export default router
>main.js
import Vue from 'vue'
import App from './App.vue'
import router from './router'
import store from './store'

Vue.config.productionTip = false

// bootstrap
import { BootstrapVue } from 'bootstrap-vue'
import 'bootstrap/dist/css/bootstrap.css'
import 'bootstrap-vue/dist/bootstrap-vue.css'
Vue.use(BootstrapVue)

Vue.config.productionTip = false

new Vue({
  router,
  store,
  render: h => h(App)
}).$mount('#app')'Web > MQTT 통신' 카테고리의 다른 글
| mqtt_vue_touchdesigner (0) | 2022.11.05 |
|---|---|
| Mac : mosquitto 브로커로 MQTT 통신 in 터치디자이너 (0) | 2022.06.22 |
| 라즈베리파이_ MQTT 클래스 불러와 Front 서버에 값 전송하기 (0) | 2022.04.21 |
| 모스키토 MQTT 환경 테스트 (0) | 2022.03.02 |
| [MQTT]실시간 통신 (0) | 2022.02.14 |
- Total
- Today
- Yesterday
- Midjourney
- 라즈베리파이
- krea
- Express
- three.js
- AI
- opencv
- colab
- sequelize
- TouchDesigner
- MCP
- node.js
- DeepLeaning
- Java
- Unity
- VR
- CNC
- 후디니
- Python
- RNN
- VFXgraph
- Arduino
- OpenClaw
- houdini
- docker
- 4dgs
- 유니티
- opticalflow
- 4d guassian splatting
- MQTT
| 일 | 월 | 화 | 수 | 목 | 금 | 토 |
|---|---|---|---|---|---|---|
| 1 | 2 | 3 | 4 | 5 | 6 | 7 |
| 8 | 9 | 10 | 11 | 12 | 13 | 14 |
| 15 | 16 | 17 | 18 | 19 | 20 | 21 |
| 22 | 23 | 24 | 25 | 26 | 27 | 28 |