
티스토리 뷰
>>참고사이트
1.mqtt class
임베디드환경에서 MQTT 사용해보기
안녕하세요. yeTi입니다. 오늘은 임베디드환경(tx2)기반에서 MQTT 브로커를 설치하고 메세징을 해보려고 합니다. MQTT brocker 설치 MQTT란, IoT용 message broker 선택하기를 기반으로 mosquitto 를 mqtt broker..
yeti.tistory.com
2. class import 경로
[PYTHON] 여러 경로의 모듈 import 하기 1
동일/하위 폴더(경로)의 모듈을 from, import 하는법 1. 필요성 파이썬에서 위와 같이 game이란 project를 진행 한다고 가정해 보겠습니다. main.py 에서 여러 패키지(폴더) 안의 다른 모듈(##.py)을 import 할.
cuorej.tistory.com
[python] 위의 디렉토리에있는 Python 클래스를 가져 오는 방법은 무엇입니까? - 리뷰나라
현재 디렉토리 위의 디렉토리에있는 파일의 클래스에서 상속하고 싶습니다. 해당 파일을 상대적으로 가져올 수 있습니까? 답변 from ..subpkg2 import mod 파이썬 문서 당 : 패키지 계층 구조 내에서 imp
daplus.net
[ _mqtt 패키지 폴더 만들고 Publisher / Subscriber class 생성 ]
오류
ImportError: attempted relative import with no known parent package
위의 디렉토리에 있는 python 클래스 링크 활용.
너무 복잡해서
그냥 폴더 아래 경로에 넣고 해결했다..
> subscriber.py
import paho.mqtt.client as mqtt

class Subscriber :
    def __init__ (self, on_message):
        self._set_client(on_message)

    def _set_client(self, on_message):
        # 새로운 클라이언트 생성
        self.client = mqtt.Client()
        # 콜백 함수 설정 on_connect(브로커에 접속), on_disconnect(브로커에 접속중료), on_subscribe(topic 구독),
        # on_message(발행된 메세지가 들어왔을 때)
        self.client.on_connect = self.on_connect
        self.client.on_disconnect = self.on_disconnect
        # client.on_subscribe = on_subscribe
        # message ##############
        self.client.on_message = on_message


    # The callback function. It will be triggered when trying to connect to the MQTT broker
    # client is the client instance connected this time
    # userdata is users' information, usually empty. If it is needed, you can set it through user_data_set function.
    # flags save the dictionary of broker response flag.
    # rc is the response code.
    # Generally, we only need to pay attention to whether the response code is 0.

    # 0: connection succeeded
    # 1: connection failed - incorrect protocol version
    # 2: connection failed - invalid client identifier
    # 3: connection failed - the broker is not available
    # 4: connection failed - wrong username or password
    # 5: connection failed - unauthorized
    # 6-255: undefined

    def on_connect(self, client, userdata, flags, rc):
    #connection check
        if rc == 0:
            print("connected OK")

        else:
            print("Bad connection Returned code=", rc)


    def on_disconnect(self,client, userdata, flags, rc=0):
        print(str(rc))


    def start(self):
        # address : localhost, port: 1883 에 연결
        self.client.connect('localhost', 1883)

        #subscribe : topic setting
        ########
        self.client.subscribe("raspberry/1",1)

        #loop
        self.client.loop_forever()

    def stop(self):
        #set the will message, when the raspberry pi is power off or network disconnect
        self.client.will_set('raspverry/1',b'{"status":"off"}')
        self.client.disconnect()


    def stop(self):
        self.client2.loop_stop()
        # 연결 종료
        self.client2.disconnect()

    def publish(self, data):
        # self.client2.loop_start()
        # common topic 으로 메세지 발행
        #토픽 ,메세지,012 qos
        self.client2.publish('rasp/1', data, 1)
> publisher
import paho.mqtt.client as mqtt

class Publisher:
    def __init__(self):
        self._set_client()

    def _set_client (self):
        # 새로운 클라이언트 생성
        self.client2 = mqtt.Client()
        # 콜백 함수 설정 on_connect(브로커에 접속), on_disconnect(브로커에 접속중료), on_publish(메세지 발행)
        self.client2.on_connect = self.on_connect
        self.client2.on_disconnect = self.on_disconnect
        self.client2.on_publish = self.on_publish
        print('init')


    def on_connect(self, client, userdata, flags, rc):
        #connection check ### 0 : connected
        if rc == 0:
            print("connected OK")
        else:
            print("Bad connection Returned code=", rc)


    def on_disconnect(self, client, userdata, flags, rc=0):
        print(str(rc))


    def on_publish(self, client, userdata, mid):
        print("In on_pub callback mid= ", mid)

    def start(self):
        # address : "192.168.43.158", port: 1883 에 연결
        self.client2.connect('localhost', 1883)
        self.client2.loop_start()
        print('mqtt_start')

    def stop(self):
        self.client2.loop_stop()
        # 연결 종료
        self.client2.disconnect()

    def publish(self, data):
        # self.client2.loop_start()
        # common topic 으로 메세지 발행
        #토픽 ,메세지,012 qos
        self.client2.publish('rasp/1', data, 1)
        print('topic : rasp/1')
인잇파일이 있어야 폴더가 패키지로 인식된다.
> __init__.py
from .publisher import Publisher
from .subscriber import Subscriber

_mqtt : 패키지이름
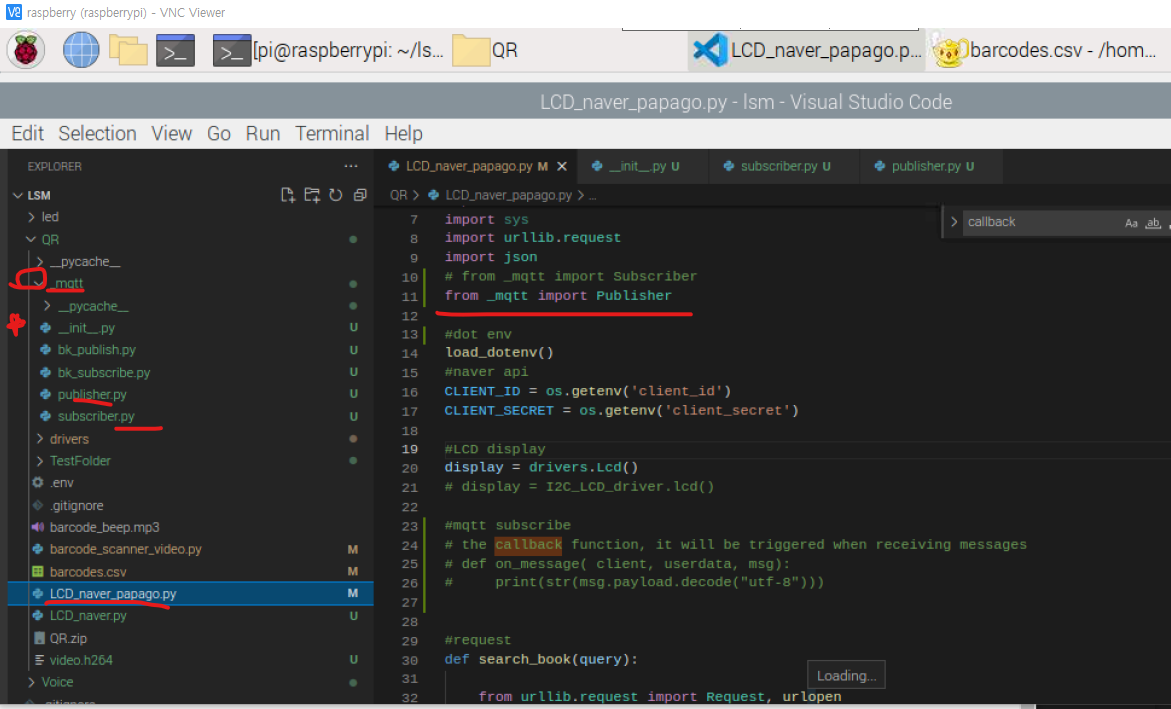
> LCD_naver_papago.py
from _mqtt import Subscriber
from _mqtt import Publisher


#mqtt subscribe
# the callback function, it will be triggered when receiving messages
def on_message( client, userdata, msg):
    print(str(msg.payload.decode("utf-8")))


...


if __name__ == "__main__":
    #mqtt
    subscriber = Subscriber(on_message)
    subscriber.start()
    publisher = Publisher()
    publisher.start()

    #csv first line only
    f = open('barcodes.csv', 'r', encoding='utf-8')
    rdr = csv.reader(f)

    for line in rdr:
        #search
        #line[1] = line 1 , scond value : isbn
        #######publish #####################
        publisher.publish(line[1])
        books = search_book(line[1])['items']

        ...
Mosquitto 브로커 설정과 프론트 연결은 다음 글을 참고한다.
https://ing-min.tistory.com/61?category=1060921
FRONT(Vue.js)_MQTT를 활용하여 라즈베리파이 신호 받기
https://ing-min.tistory.com/49 : 참고링크 1. Desktop 모스키토실행 (모스키토 config 수정해준다) : 포트 설정 / ... # listener port-number [ip address/host name/unix socket path] #listener listener 1..
ing-min.tistory.com
'Web > MQTT 통신' 카테고리의 다른 글
| mqtt_vue_touchdesigner (0) | 2022.11.05 |
|---|---|
| Mac : mosquitto 브로커로 MQTT 통신 in 터치디자이너 (0) | 2022.06.22 |
| FRONT(Vue.js)_MQTT를 활용하여 라즈베리파이 신호 받기 (0) | 2022.03.12 |
| 모스키토 MQTT 환경 테스트 (0) | 2022.03.02 |
| [MQTT]실시간 통신 (0) | 2022.02.14 |
- Total
- Today
- Yesterday
- ai film
- Python
- CNC
- VFXgraph
- docker
- RNN
- three.js
- MQTT
- DeepLeaning
- TouchDesigner
- Midjourney
- MCP
- 후디니
- node.js
- VR
- krea
- Express
- 라즈베리파이
- 유니티
- 4d guassian splatting
- colab
- opencv
- AI
- opticalflow
- houdini
- Java
- 4dgs
- Unity
- sequelize
- Arduino
| 일 | 월 | 화 | 수 | 목 | 금 | 토 |
|---|---|---|---|---|---|---|
| 1 | 2 | 3 | 4 | 5 | 6 | 7 |
| 8 | 9 | 10 | 11 | 12 | 13 | 14 |
| 15 | 16 | 17 | 18 | 19 | 20 | 21 |
| 22 | 23 | 24 | 25 | 26 | 27 | 28 |