

티스토리 뷰
728x90
반응형
https://m.blog.naver.com/bitelab/221892417268
[Bitelab] 아두이노 스피커 모듈 lm386을 이용하여 노래 만들기
아두이노 스피커 모듈 lm386을 이용하여 노래 만들기 간단한 아두이노 스피커 모듈을 활용하여 노래를 만들...
blog.naver.com
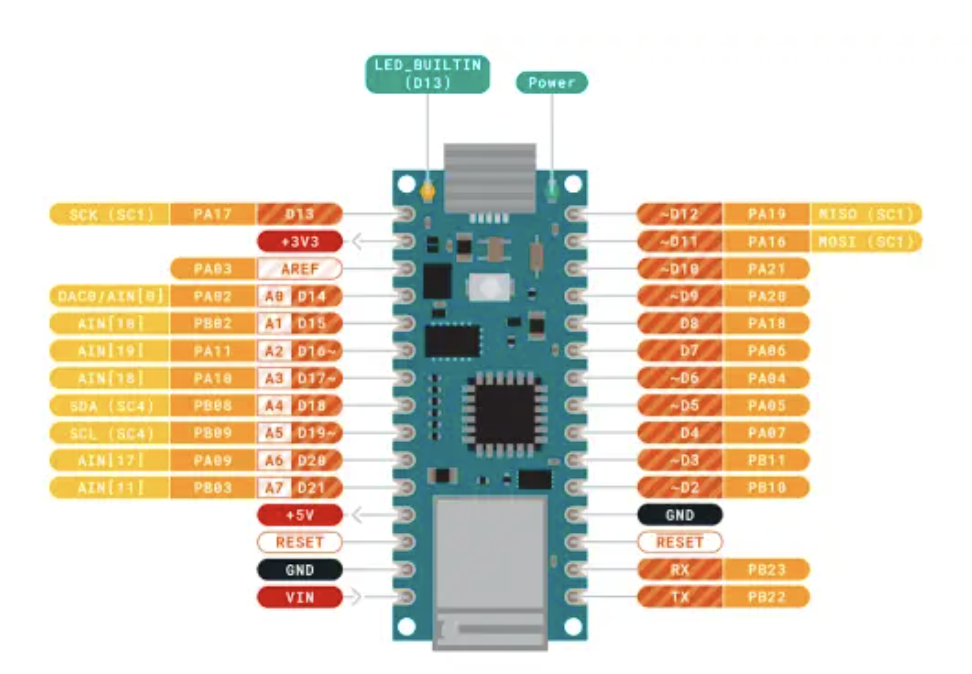
Pin = D2
VCC = 5v
GND = -
여기에서 시작했다.
const int c = 261;
const int d = 294;
const int e = 329;
const int f = 349;
const int g = 391;
const int gS = 415;
const int a = 440;
const int aS = 455;
const int b = 466;
const int cH = 523;
const int cSH = 554;
const int dH = 587;
const int dSH = 622;
const int eH = 659;
const int fH = 698;
const int fSH = 740;
const int gH = 784;
const int gSH = 830;
const int aH = 880;
//피아노를 배우신분 음악을 배우셨다면 코드에 대해서 각각의 값을 할당 시켜 줍니다.

const int buzzerPin = 2;
int counter = 0;

void setup()
{
  pinMode(buzzerPin, OUTPUT); //부저핀을 출력으로 설정
}

void loop()
{
  firstSection();     //첫번째 섹션을 연주합니다.
  secondSection();    //두번째 섹션을 연주합니다.

  //변주 1
  beep(f, 250);
  beep(gS, 500);
  beep(f, 350);
  beep(a, 125);
  beep(cH, 500);
  beep(a, 375);
  beep(cH, 125);
  beep(eH, 650);
  delay(500);


  secondSection(); //2번째 섹션을 반복

  //변주 2
  beep(f, 250);
  beep(gS, 500);
  beep(f, 375);
  beep(cH, 125);
  beep(a, 500);
  beep(f, 375);
  beep(cH, 125);
  beep(a, 650);
  delay(650);
}

//소리를 설정하는 부분입니다. 스피커 모듈의 핀을 설정하는 부분입니다.
void beep(int note, int duration)
{
  //스피커 핀의 설정을 정의 합니다.
  tone(buzzerPin, note, duration);

  //스피커 핀을 멈춥니다.
  noTone(buzzerPin);

  delay(50);

  //카운터를 증가 시킵니다.
  counter++;
}


//첫번째 연주에 관한 섹션
void firstSection()
{
  beep(a, 500);
  beep(a, 500);
  beep(a, 500);
  beep(f, 350);
  beep(cH, 150);
  beep(a, 500);
  beep(f, 350);
  beep(cH, 150);
  beep(a, 650);

  delay(500);

  beep(eH, 500);
  beep(eH, 500);
  beep(eH, 500);
  beep(fH, 350);
  beep(cH, 150);
  beep(gS, 500);
  beep(f, 350);
  beep(cH, 150);
  beep(a, 650);

  delay(500);
}


// 두번째 연주에 관한 섹션
void secondSection()
{
  beep(aH, 500);
  beep(a, 300);
  beep(a, 150);
  beep(aH, 500);
  beep(gSH, 325);
  beep(gH, 175);
  beep(fSH, 125);
  beep(fH, 125);
  beep(fSH, 250);

  delay(325);

  beep(aS, 250);
  beep(dSH, 500);
  beep(dH, 325);
  beep(cSH, 175);
  beep(cH, 125);
  beep(b, 125);
  beep(cH, 250);

  delay(350);
}
https://ing-min.tistory.com/206
VL53L1X ToF 레이저 거리 측정 센서 모듈_아두이노
https://www.bneware.com/blogPost/esp32_vl53l1x_arduino ESP32 VL53L1x 아두이노 테스트 www.bneware.comVL53L1X ToF 레이저 거리 측정 센서 모듈https://www.devicemart.co.kr/goods/view?no=12990449 VL53L1X ToF 레이저 거리 측정 센서
ing-min.tistory.com
목표 : Wifi : MQTT 통신
거리측정 센서 + 스피커
측정한 거리는 MQTT로 내보낸다.(publish)
스피커로 출력할 소리는 MQTT로 받아서 소리를 낸다 (subscribe)
code
#include <WiFiNINA.h>
#include <ArduinoMqttClient.h>
#include <Wire.h>
#include "SparkFun_VL53L1X.h"

// WiFi credentials
char ssid[] = "TX_Lab";    // your network SSID (name)
char pass[] = "txtxxoxo123";    // your network password (use for WPA, or use as key for WEP)

const int buzzerPin = 2;
int ledPin = 13;
int counter = 0;
const int interval = 1000;  // Distance measurement interval in ms
unsigned long previousMillis = 0;
int count = 0;

// WiFi and MQTT clients
WiFiClient wifiClient;
MqttClient mqttClient(wifiClient);

// MQTT broker information
const char broker[] = "test.mosquitto.org";
int port = 1883;
const char topic[] = "arduino/dis";  // Publishing distance
const char topic2[] = "arduino/das";  // Subscribing sound commands

// Distance sensor pins and object
#define SHUTDOWN_PIN 2
#define INTERRUPT_PIN 3
SFEVL53L1X distanceSensor;

// Note frequencies
const int c = 261;
const int d = 294;
const int e = 329;
const int f = 349;
const int g = 391;
const int gS = 415;
const int a = 440;
const int aS = 455;
const int b = 466;
const int cH = 523;
const int cSH = 554;
const int dH = 587;
const int dSH = 622;
const int eH = 659;
const int fH = 698;
const int fSH = 740;
const int gH = 784;
const int gSH = 830;
const int aH = 880;

void setup() {
  pinMode(buzzerPin, OUTPUT); // 부저핀을 출력으로 설정
  pinMode(LED_BUILTIN, OUTPUT);
  Serial.begin(9600); // Set baud rate to 9600

  // Connect to WiFi
  while (WiFi.begin(ssid, pass) != WL_CONNECTED) {
    delay(1000);
    Serial.println("WiFi try...");
    // Blink LED while trying to connect
    digitalWrite(LED_BUILTIN, HIGH);
    delay(100);
    digitalWrite(LED_BUILTIN, LOW);
  }

  // Blink LED to indicate WiFi connected
  for (int i = 0; i < 3; i++) {
    digitalWrite(LED_BUILTIN, HIGH);
    delay(50);
    digitalWrite(LED_BUILTIN, LOW);
    delay(50);
  }
  Serial.println("WiFi connected");
  Serial.print("IP address: ");
  Serial.println(WiFi.localIP());

  // Connect to MQTT broker
  if (!mqttClient.connect(broker, port)) {
    Serial.print("MQTT connection failed! Error code = ");
    Serial.println(mqttClient.connectError());
    while (1);
  }

  // Initialize distance sensor
  Wire.begin();
  if (distanceSensor.begin() != 0) {
    Serial.println("Sensor failed to begin. Please check wiring. Freezing...");
    while (1);
  }
  Serial.println("Sensor online!");

  // Set callback function for received messages
  mqttClient.onMessage(messageReceived);
  mqttClient.subscribe(topic2);
}

void loop() {
  // Check WiFi connection
  if (WiFi.status() == WL_CONNECTED) {
    digitalWrite(LED_BUILTIN, HIGH);
    delay(1000);
    digitalWrite(LED_BUILTIN, LOW);
    delay(1000);
  }
  mqttClient.poll();

  unsigned long currentMillis = millis();

  // Send distance reading at defined intervals
  if (currentMillis - previousMillis >= interval) {
    previousMillis = currentMillis;

    // Get distance measurement
    distanceSensor.startRanging();
    while (!distanceSensor.checkForDataReady()) {
      delay(1);
    }
    int distance = distanceSensor.getDistance();
    distanceSensor.clearInterrupt();
    distanceSensor.stopRanging();

    // Print distance to serial monitor
    Serial.print("Distance(mm): ");
    Serial.println(distance);

    // Send distance to MQTT
    mqttClient.beginMessage(topic);
    mqttClient.print(distance);
    mqttClient.endMessage();

    count++;
  }
}

// Note string to frequency mapping function
int getNoteFrequency(String note) {
  if (note == "c") return c;
  else if (note == "d") return d;
  else if (note == "e") return e;
  else if (note == "f") return f;
  else if (note == "g") return g;
  else if (note == "gS") return gS;
  else if (note == "a") return a;
  else if (note == "aS") return aS;
  else if (note == "b") return b;
  else if (note == "cH") return cH;
  else if (note == "cSH") return cSH;
  else if (note == "dH") return dH;
  else if (note == "dSH") return dSH;
  else if (note == "eH") return eH;
  else if (note == "fH") return fH;
  else if (note == "fSH") return fSH;
  else if (note == "gH") return gH;
  else if (note == "gSH") return gSH;
  else if (note == "aH") return aH;
  else return 0;
}

// 사운드 재생 처리
void messageReceived(int messageSize) {
  String message = "";
  while (mqttClient.available()) {
    message += (char)mqttClient.read();
  }

  Serial.print("Received message: ");
  Serial.println(message);

  // Parse the received message manually
  String noteStr = "";
  int duration = 0;
  int msgIndex = message.indexOf("\"msg\": \"");
  if (msgIndex != -1) {
    msgIndex += 8; // Move past "msg": "
    int commaIndex = message.indexOf(',', msgIndex);
    int endQuoteIndex = message.indexOf('\"', commaIndex);
    if (commaIndex != -1 && endQuoteIndex != -1) {
      noteStr = message.substring(msgIndex, commaIndex);
      duration = message.substring(commaIndex + 1, endQuoteIndex).toInt();
      int note = getNoteFrequency(noteStr);
      Serial.print("Note string: ");
      Serial.println(noteStr);
      Serial.print("Frequency: ");
      Serial.println(note);
      Serial.print("Duration: ");
      Serial.println(duration);
      if (note > 0) {
        Serial.print("Playing note: ");
        Serial.print(noteStr);
        Serial.print(" (frequency: ");
        Serial.print(note);
        Serial.print(") for duration: ");
        Serial.println(duration);
        beep(note, duration);
      } else {
        Serial.println("Invalid note");
      }
    } else {
      Serial.println("Invalid message format");
    }
  } else {
    Serial.println("Invalid message format");
  }
}

// 소리를 설정하는 부분
void beep(int note, int duration) {
  Serial.print("Beep: ");
  Serial.print(note);
  Serial.print(", duration: ");
  Serial.println(duration);
  tone(buzzerPin, note, duration);
  delay(duration); // 부저가 소리를 내는 시간을 확보
  noTone(buzzerPin);
  delay(50);
  counter++;
}
728x90
반응형
'Iot' 카테고리의 다른 글
| 아두이노_전구_릴레이 (0) | 2024.04.26 |
|---|---|
| 아두이노 I2C 주소 찾기(여러 센서 같이 작동시키기) (0) | 2024.04.24 |
| 아두이노 _ 플로터 _DIY (GRBL CNC Shield + Z axis servo MIGRBL) + UGS (0) | 2024.04.21 |
| 아두이노 나노 33 IOT _ UART ? (0) | 2024.04.19 |
| 아두이노 -GPS 센서 (GY-NEO6MV2) (1) | 2024.04.18 |
250x250
공지사항
최근에 올라온 글
최근에 달린 댓글
- Total
- Today
- Yesterday
링크
TAG
- houdini
- opticalflow
- VFXgraph
- Midjourney
- colab
- Unity
- 후디니
- AI
- Python
- VR
- DeepLeaning
- node.js
- MCP
- krea
- sequelize
- CNC
- 유니티
- Java
- TouchDesigner
- MQTT
- docker
- Arduino
- 라즈베리파이
- 4dgs
- 4d guassian splatting
- RNN
- Express
- three.js
- OpenClaw
- opencv
| 일 | 월 | 화 | 수 | 목 | 금 | 토 |
|---|---|---|---|---|---|---|
| 1 | 2 | 3 | 4 | 5 | 6 | 7 |
| 8 | 9 | 10 | 11 | 12 | 13 | 14 |
| 15 | 16 | 17 | 18 | 19 | 20 | 21 |
| 22 | 23 | 24 | 25 | 26 | 27 | 28 |
글 보관함
반응형